Local seller onboarding / Product listing
Product Listing Essentials
For local sellers in Israel
A good listing answers three questions: What is it? Which version am I buying? What should I expect? Use this guide to turn seller-form inputs into a clear, consistent buyer experience.
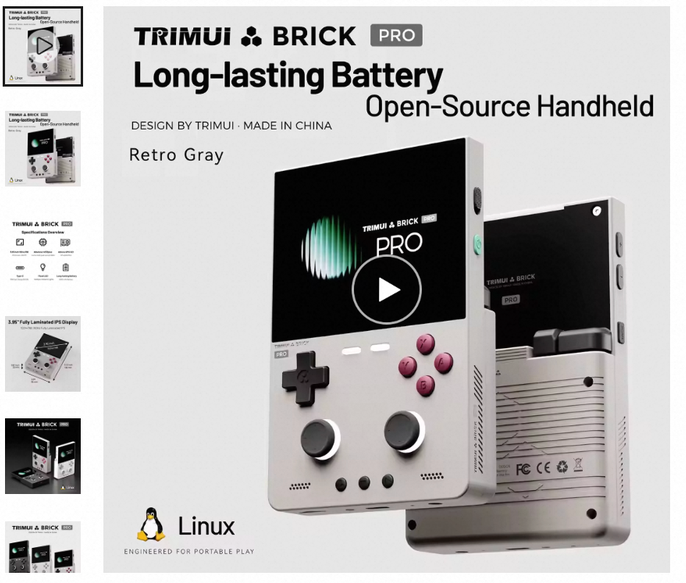
Two different products, one interface lesson. The seller form uses a stick-vacuum category in an AliExpressDirect account. The buyer-page screenshots show a TRIMUI handheld console. They illustrate display locations, not a before-and-after test of the same product.
Pricing in this guide: in the Supply Price model taught here, you sell to AliExpress at your supply price. AliExpress sets the buyer's retail price and uses your supply price as the settlement basis.
The explanations are in English. Original screenshots retain their real English/Chinese interface, including errors and inconsistent wording. This tutorial is a reading guide, not a live publishing tool.
Start with the buyer's search
Before you fill in a form, understand what a buyer has to choose from.
What you enter
Prepare an accurate product name, a recognisable main image and relevant features. Think of the words a buyer would use to describe the product's job.
Where buyers see it
Buyers search from the homepage, scan result cards, then open a product page. Cards show an image, a shortened title and price alongside platform information.
Why it matters
A buyer needs to recognise a useful match quickly. Clarity helps them decide whether to open your listing; it does not guarantee a search position.
- On the buyer site, check the delivery country, display language and currency. The supplied example shows Israel, English and USD.
- Enter a meaningful product query in the search bar. Read the results as a shopper: can you tell what each item is without opening it?
- Open a relevant result. Notice how the title, gallery, version selectors and delivery information work together.
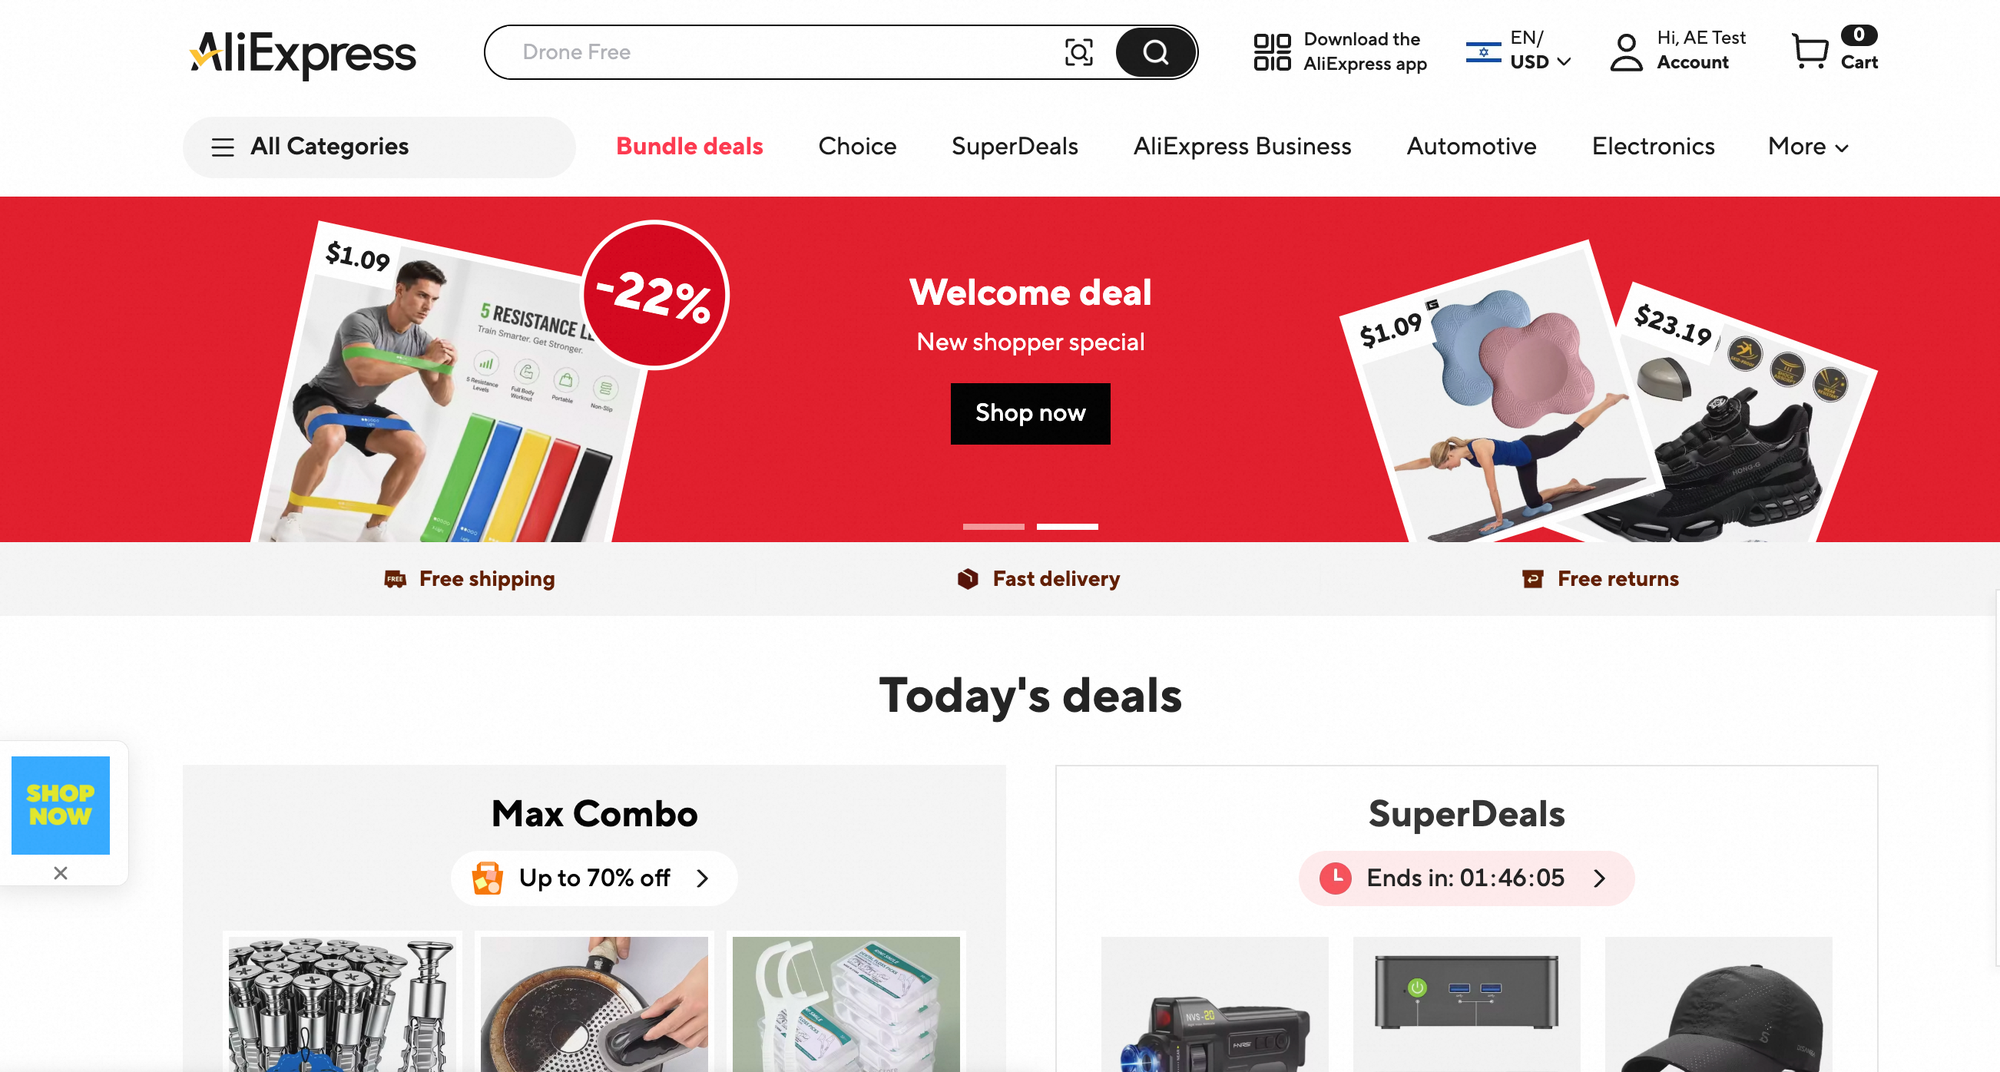
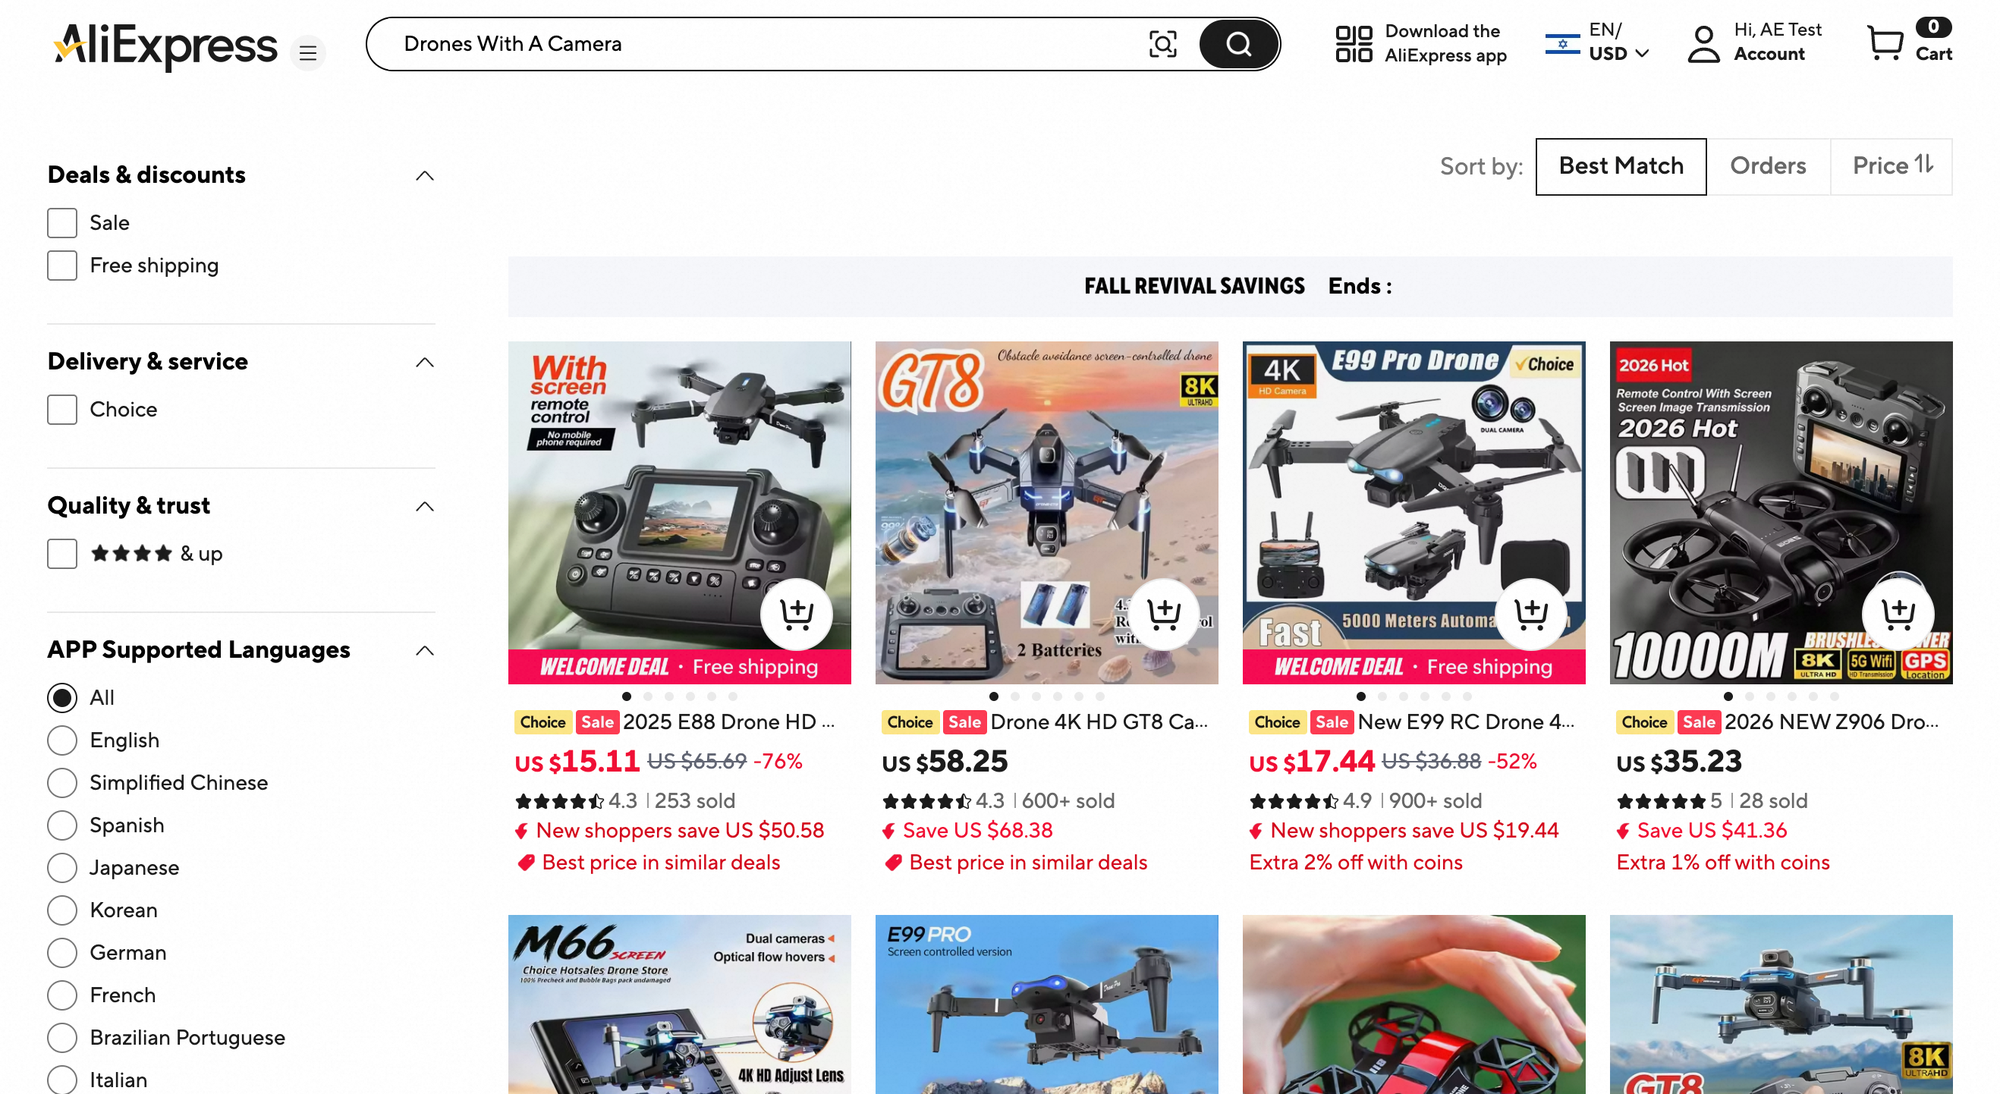
The drone search demonstrates browsing only. It is not a product or keyword recommendation for your store. Homepage promotions, ratings and sales counts are not fields you type into this listing form.
Create a new listing—or edit the right one
Use the seller workspace, not the buyer website, to enter product information.
What you enter
Open Products → Publish Products, or use Add New Product from Product Management. For an existing listing, find it in Product Management and choose Edit.
Where buyers see it
These navigation controls are seller-only. Buyers see the product information after the listing reaches an appropriate live state—not the admin form.
Why it matters
Starting from the correct product prevents duplicate listings and accidental changes to a different item.
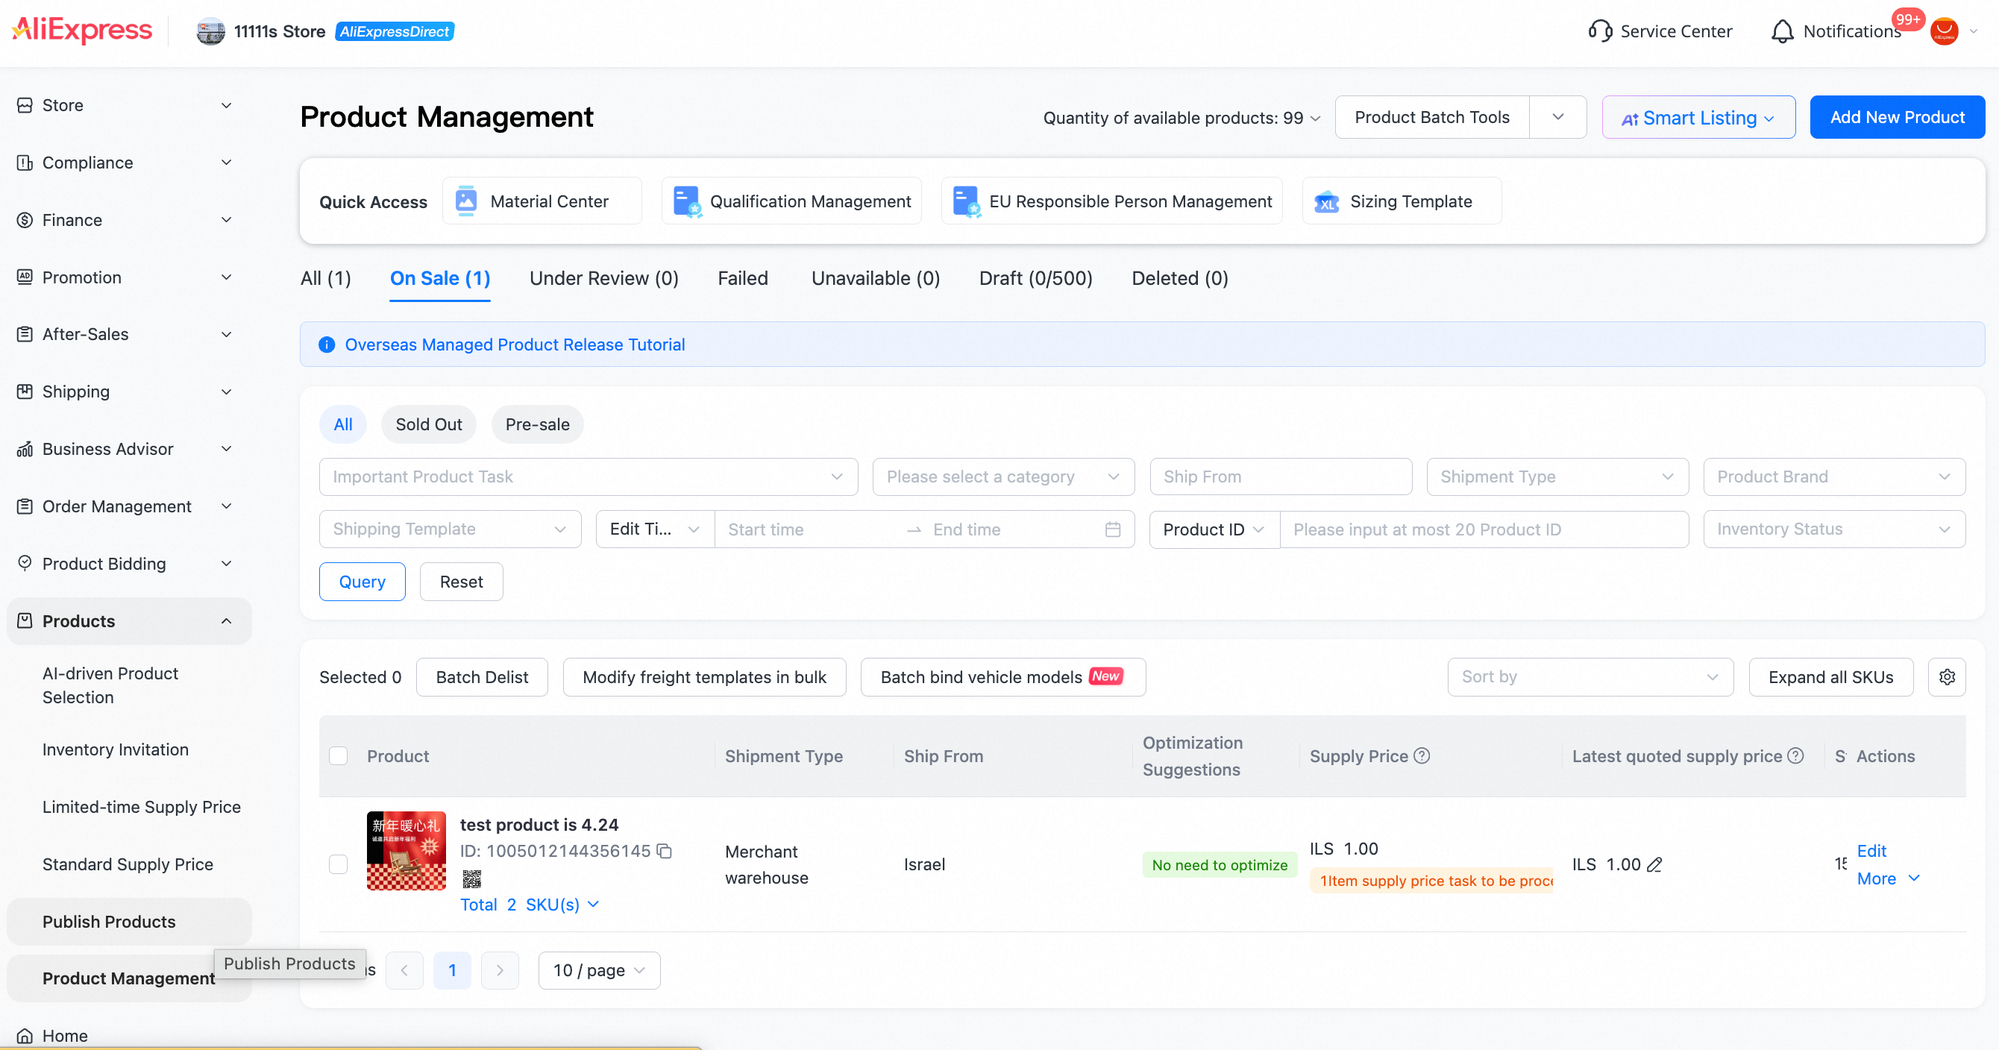
Prepare your assets first. The quick-access entry is named Material Center. You can prepare materials there, or use Add image inside the form and follow the upload dialog shown in your account. The upload dialog itself is not included here.
Keep this Product Management page in mind: after submission, you will return here to inspect Under Review, Failed or On Sale—not assume success from a click.
Give the product a clear identity
Language, title and category should describe the same product—not three different ideas of it.
What you enter
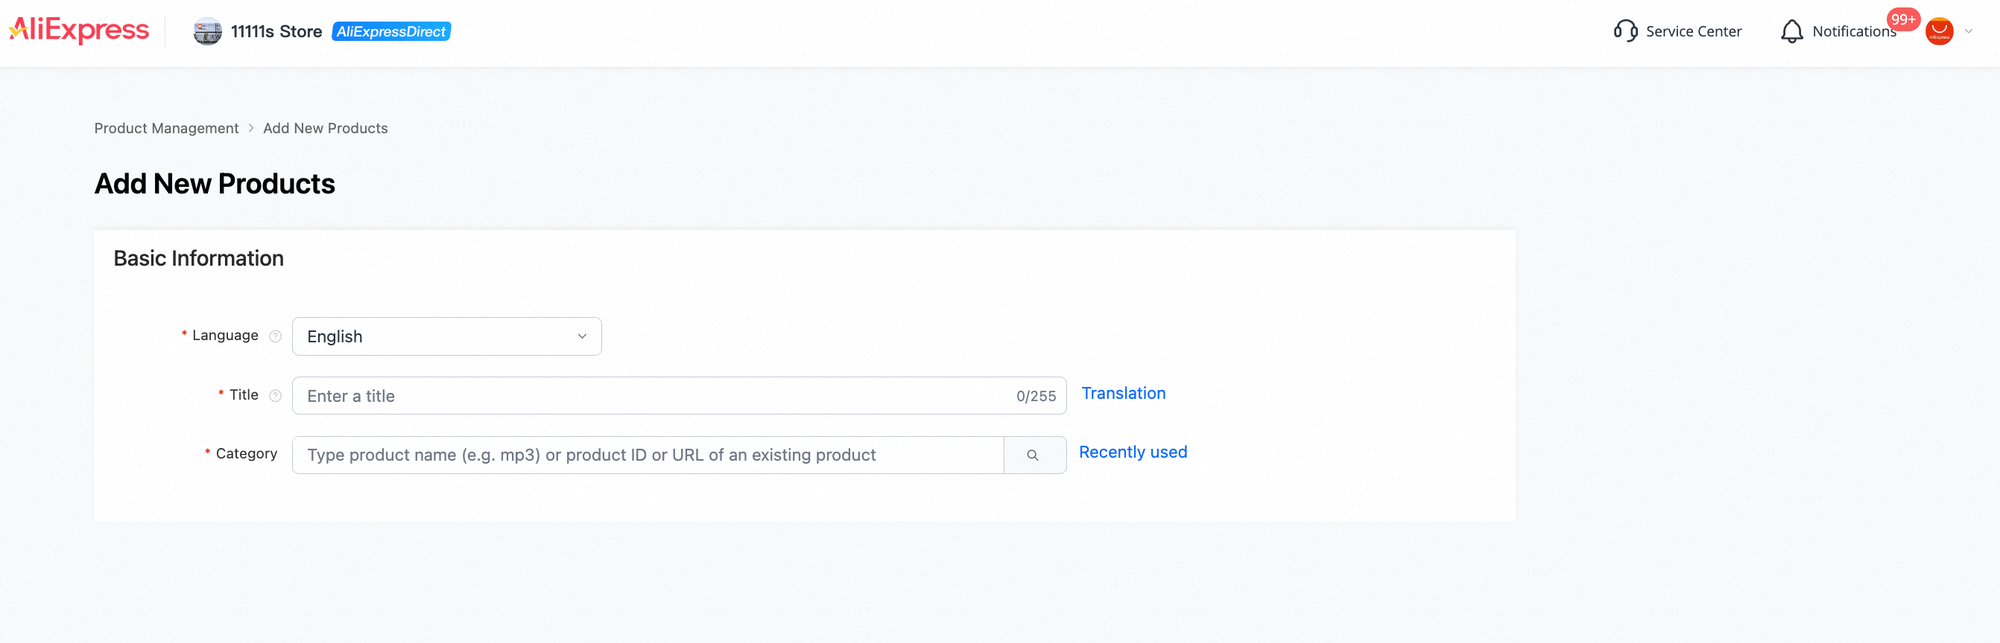
Check Language, write an accurate Title, then search for and confirm the correct Category. English is selected in this example.
Where buyers see it
The title appears in search results and at the top of the buyer page. Category influences classification and the relevant attribute fields; the form's exact category path may not be shown in the same place.
Why it matters
Buyers need to recognise the product and understand its purpose. The right category also helps you provide the right facts.
Write a useful title
Include meaningful product/search terms and the core function. Use your actual brand and model where relevant. Avoid repeated keywords and claims you cannot support.
The counter shows 0/255: 255 is the limit displayed in this example, not a target to fill. A Translation entry is visible. Review source wording and translation quality; the unopened language menu does not establish support for every language or automatic translation of all text and images.
Choose the exact category
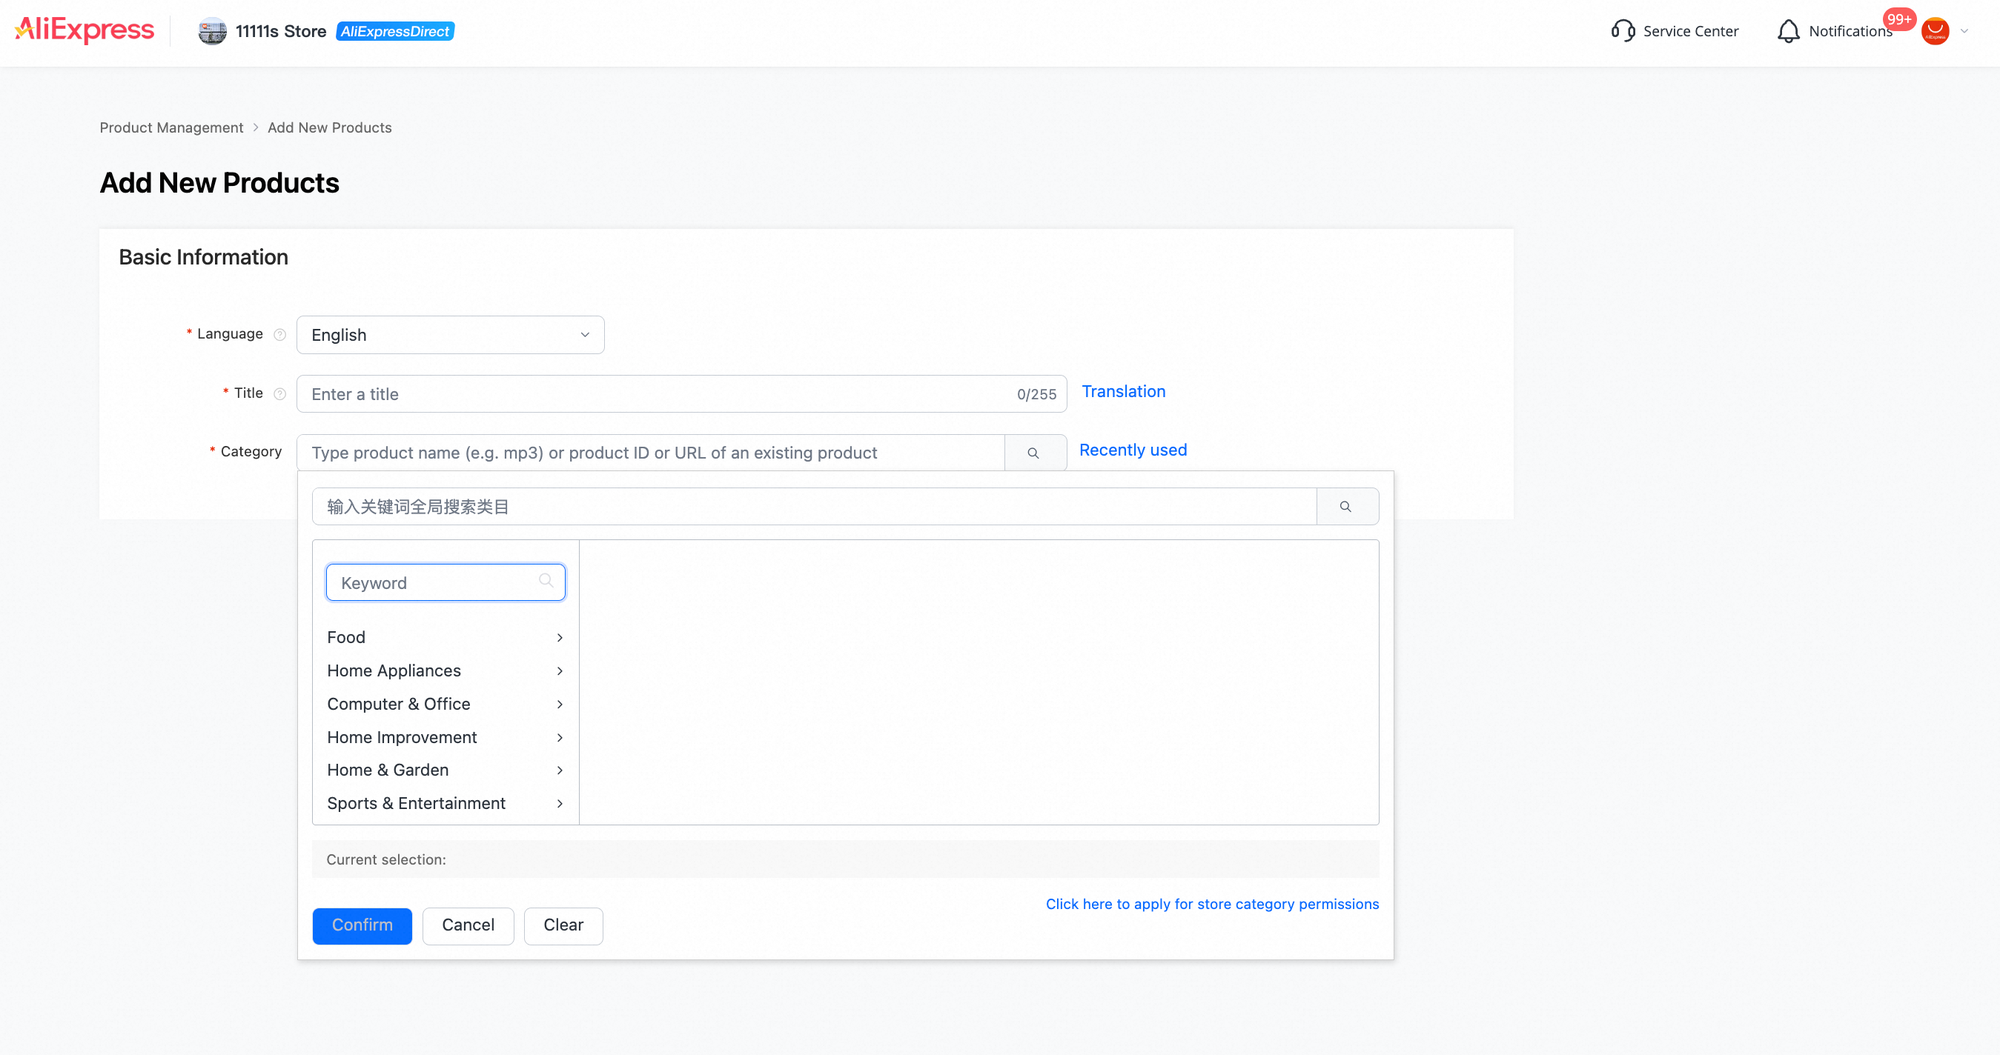
- Open the category selector and search using Keyword.
- Inspect the full path under Current selection.
- Use Confirm only when it matches your product. If unsure, ask your account manager.
Home Appliances / Cleaning Appliances / Stick Vacuum Cleaner
This is the vacuum example's path. Do not apply it to the TRIMUI console.
Core function + meaningful feature + product type + brand/model
Placing brand or core terms at the end is one organisation suggestion from the lesson, not an algorithm rule or a ranking promise. Choose a readable order that fits your actual product.
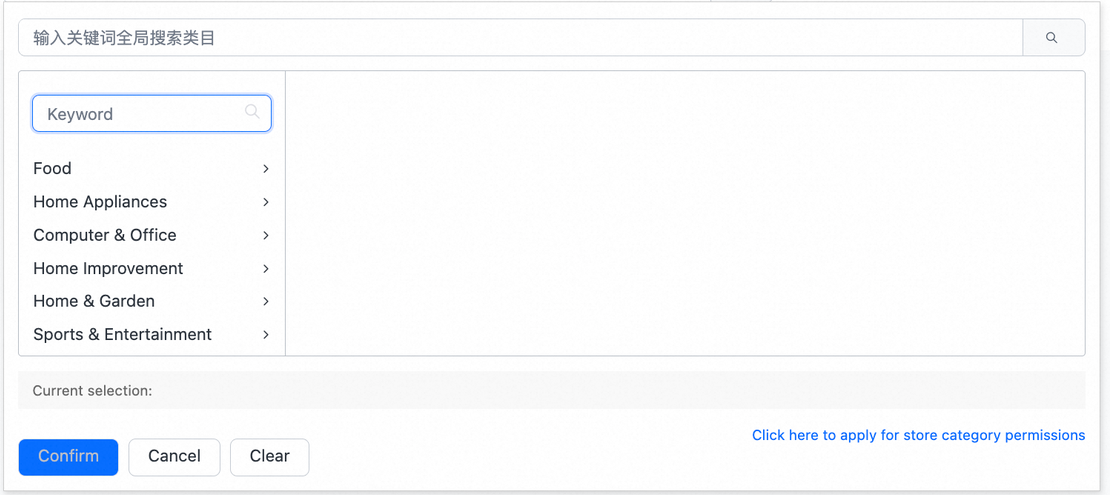

The Chinese placeholder at the top of the selector asks you to enter keywords to search categories. It is interface wording, not something to paste into your product title.
Reference screenshots 04–05 · Initial fields and category selector
Know what each of the five areas controls
Work through the form in order. Not every seller input becomes a visible block on the buyer page.
What you enter
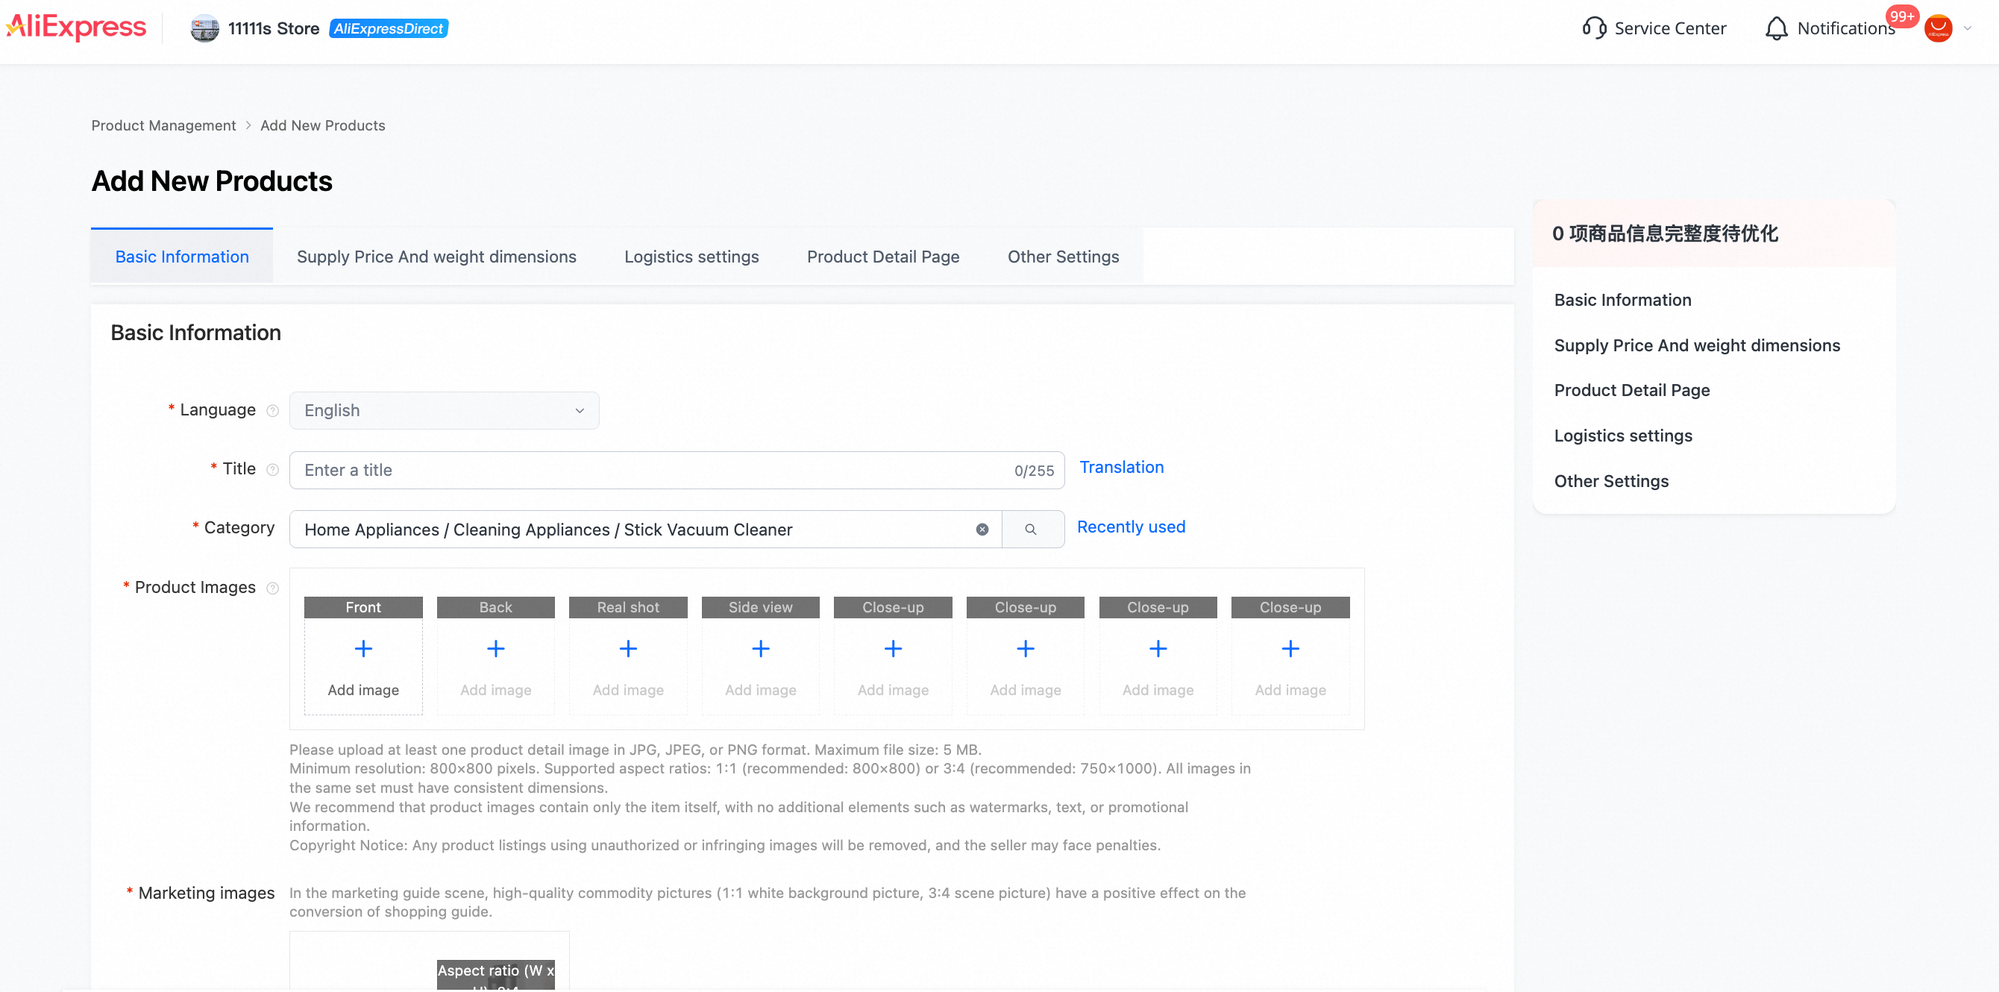
Complete the five areas below, starting with Basic Information and finishing with Other Settings. Use the tabs to return to an area that needs a correction.
Where buyers see it
Information is distributed across the title, gallery, variant choices, Specifications, Description and delivery panel. Some fields remain internal.
Why it matters
The form is a way to collect facts and fulfilment settings. The buyer page reorganises them to support a purchase decision.

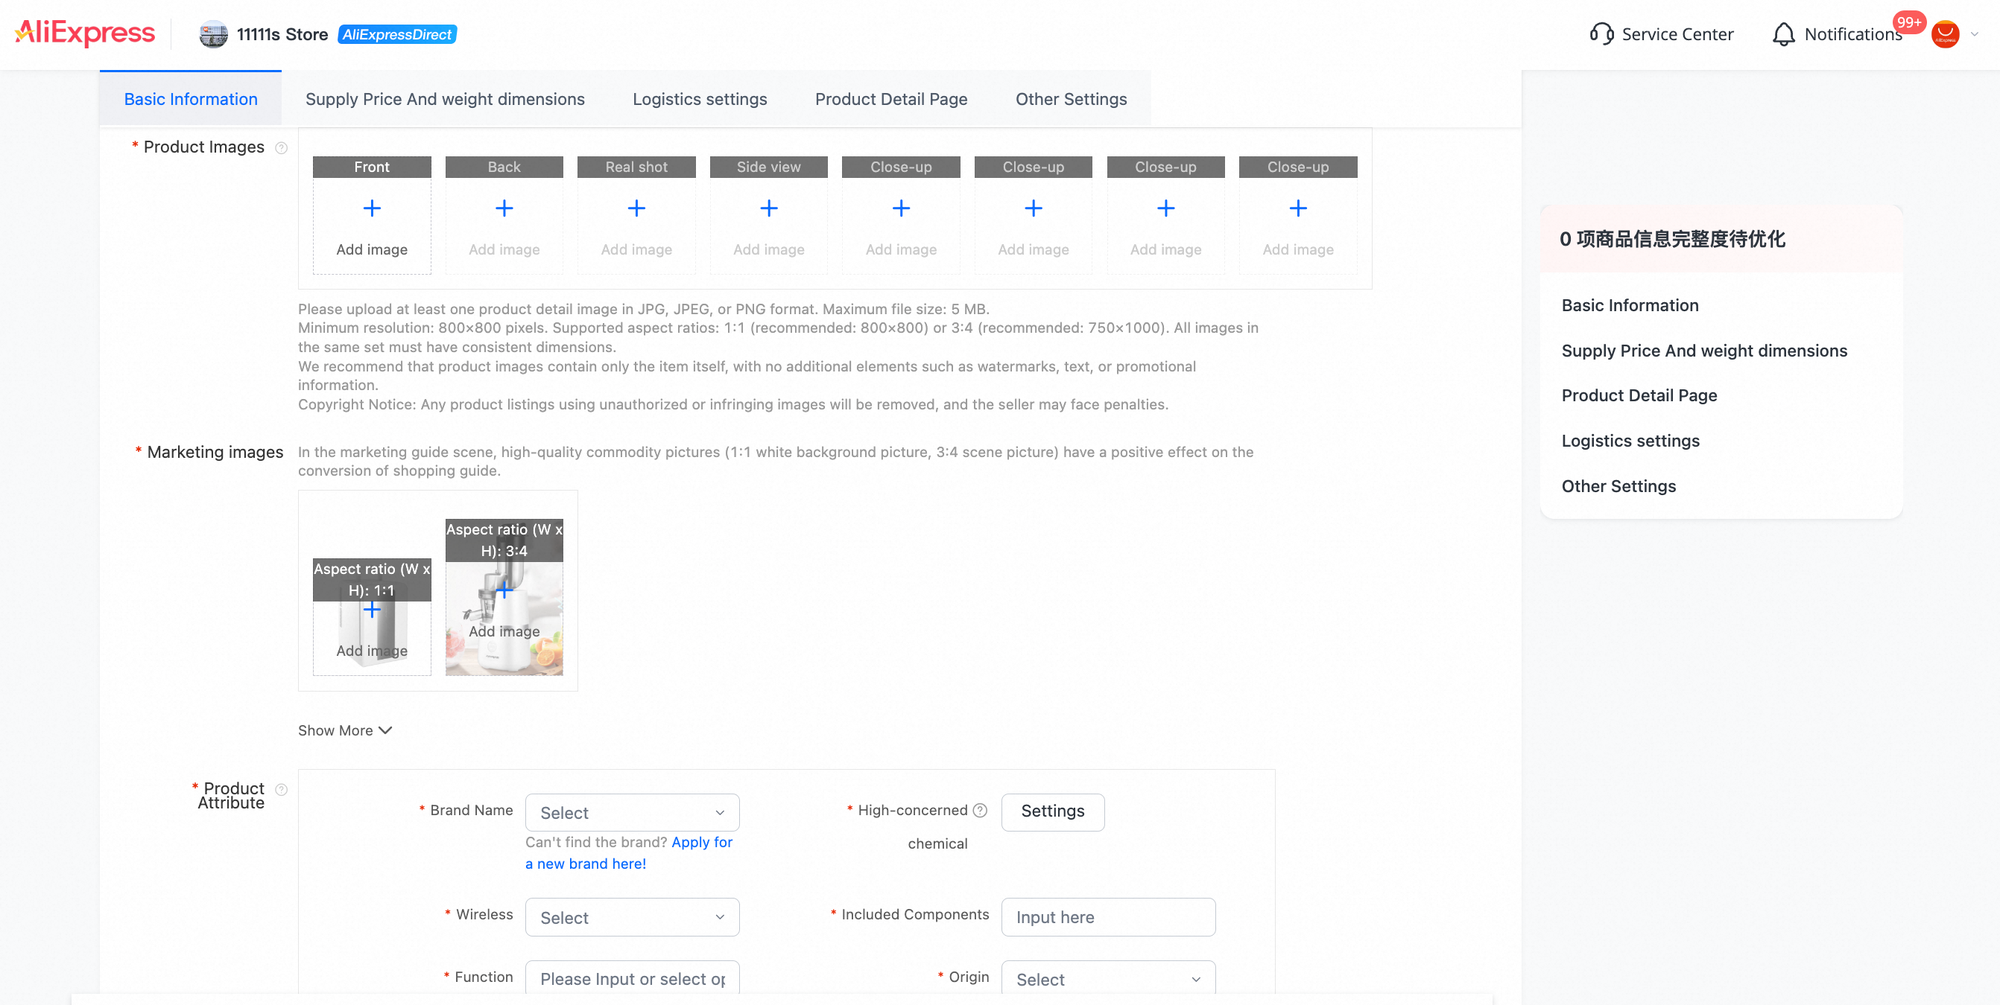
- Basic InformationIdentity, product images, marketing assets, attributes and the instruction manual.
- Supply Price And weight dimensionsSaleable versions, your selling price to AliExpress (the settlement basis), stock, internal codes and physical/logistics information.
- Logistics settingsAn existing shipping template and the applicable shipment-declaration rules.
- Product Detail PageBuyer-facing explanatory text, images and the description language.
- Other SettingsPayment-related support and applicable product-publishing agreements.
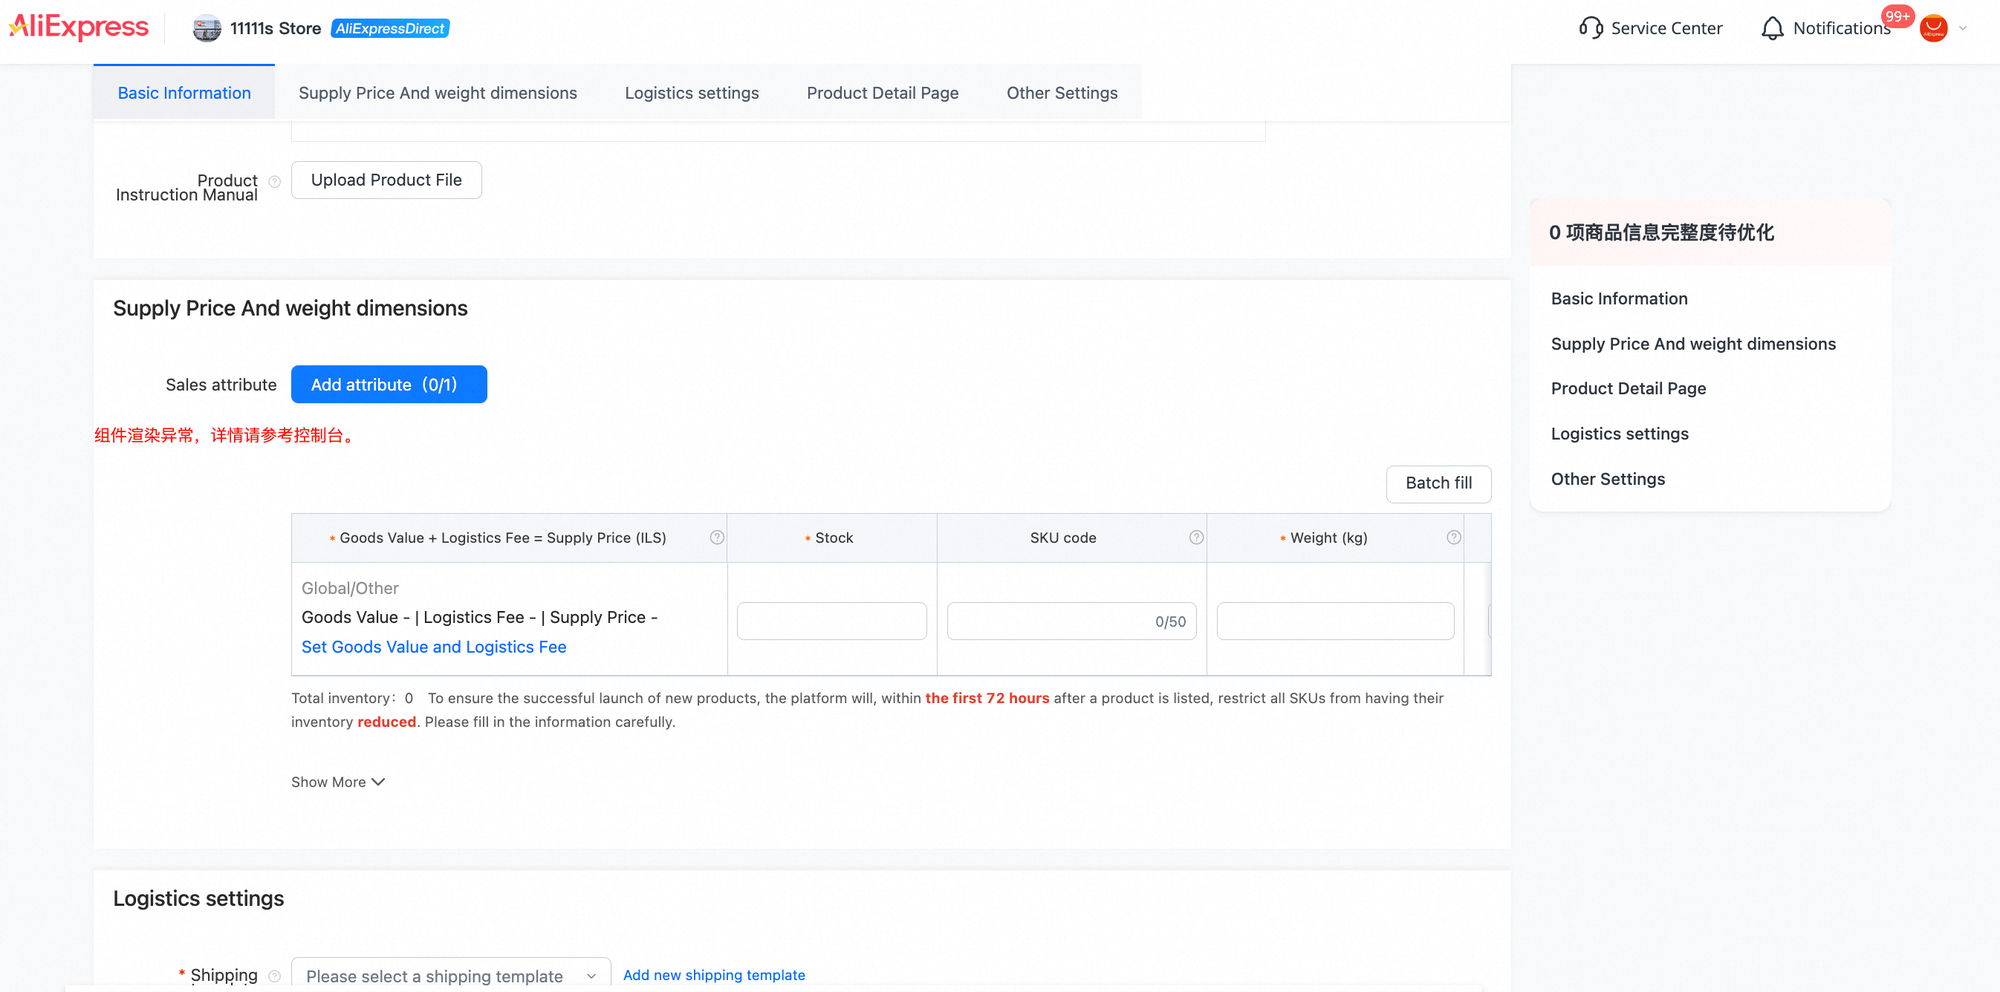
Do not use the sidebar's “0” as a pass. The Chinese completeness panel already shows 0 while the form is empty. Check the required fields, validation messages and agreements yourself.
Reference screenshot 06 · Five areas, image rules and the empty-form completeness panel
Make the product easy to recognise
Product images explain what is for sale. Marketing images are a separate set of assets.
What you enter
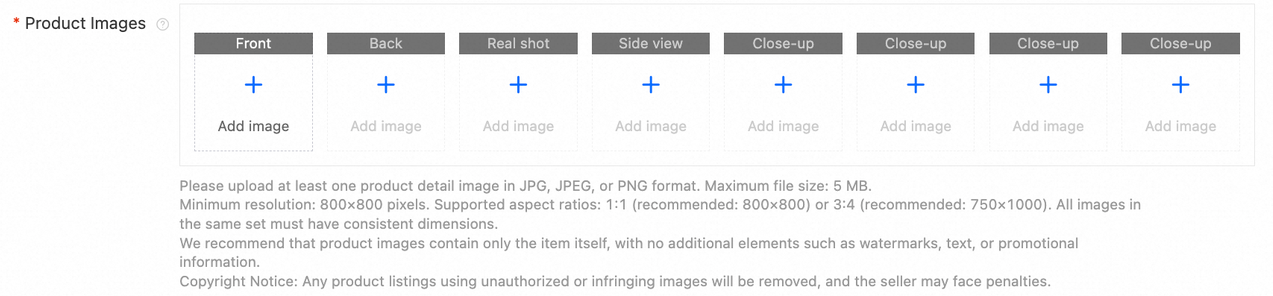
Use Add image in Product Images to upload accurate views of your product. Prepare suitable assets for the separate Marketing images area too.
Where buyers see it
Product images feed the main product gallery and thumbnails. Marketing images are for suitable marketing placements—not a direct input for Brand+ or About the brand.
Why it matters
The first image identifies the item; other views help buyers inspect its shape, details and included parts. Clear images reduce uncertainty about what will arrive.
Follow the visible upload guidance
- Upload at least one product image. Eight visible positions do not mean all eight are required.
- Use JPG, JPEG or PNG, with a maximum of 5 MB per file.
- Supported proportions are 1:1 or 3:4. Images in the same set should have consistent dimensions.
- Use a clear first view, then useful rear, side, real-life or detail views as appropriate. Only use images you have the right to use.
Keep the image focused on the product
The form recommends the product alone without extra watermarks, text or promotional information. Follow that recommendation; do not add “Free shipping” or coupon text to the main image just because another listing does.
Size wording to check: the interface says a minimum of 800 × 800, but also recommends 750 × 1000 for portraits. Use 800 × 800 for a square image; for portraits, check the actual upload validation rather than treating both statements as consistent.
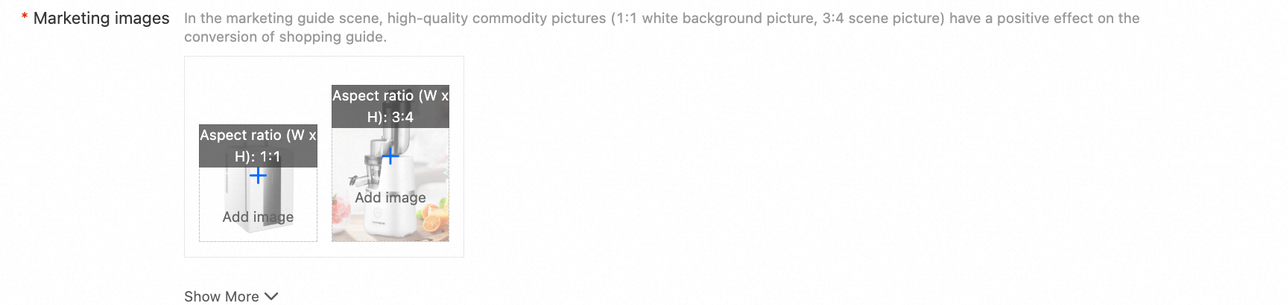
Prepare marketing formats separately
The area has a required-field asterisk and shows 1:1 white-background and 3:4 scene positions. Check your account's validation to learn whether both uploads are required; the asterisk alone does not establish that.
Choose clean, relevant assets for those formats. Uploading them does not automatically grant Brand+ or generate brand statistics.
A play symbol in the TRIMUI gallery belongs to that listing's media. Uploading images does not automatically create a video. Video is outside this lesson.
Reference screenshot 07 · Product Images and Marketing images together
Turn product facts into usable information
Attributes help buyers compare. A manual helps them understand setup and use.
What you enter
Fill the applicable Product Attribute fields with true values for the selected category. Add a suitable instruction file through Product Instruction Manual → Upload Product File.
Where buyers see it
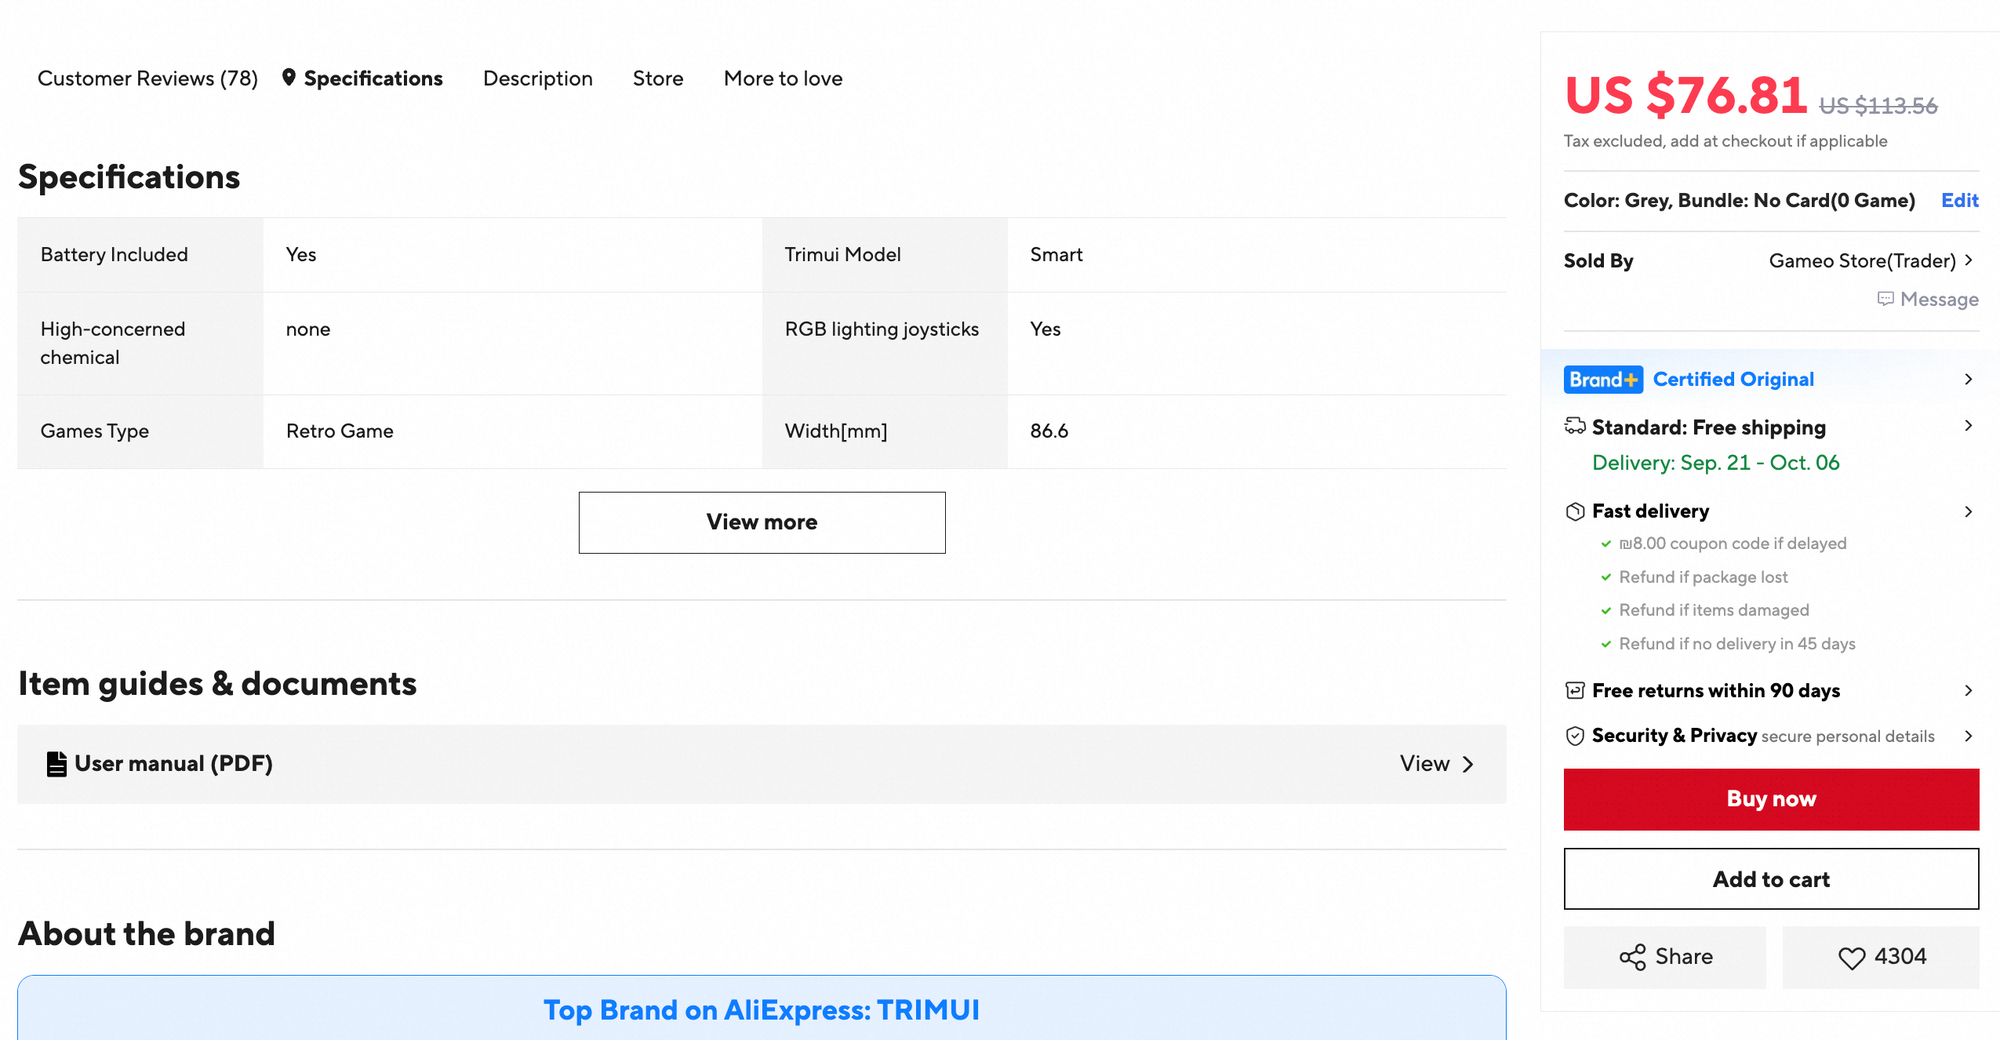
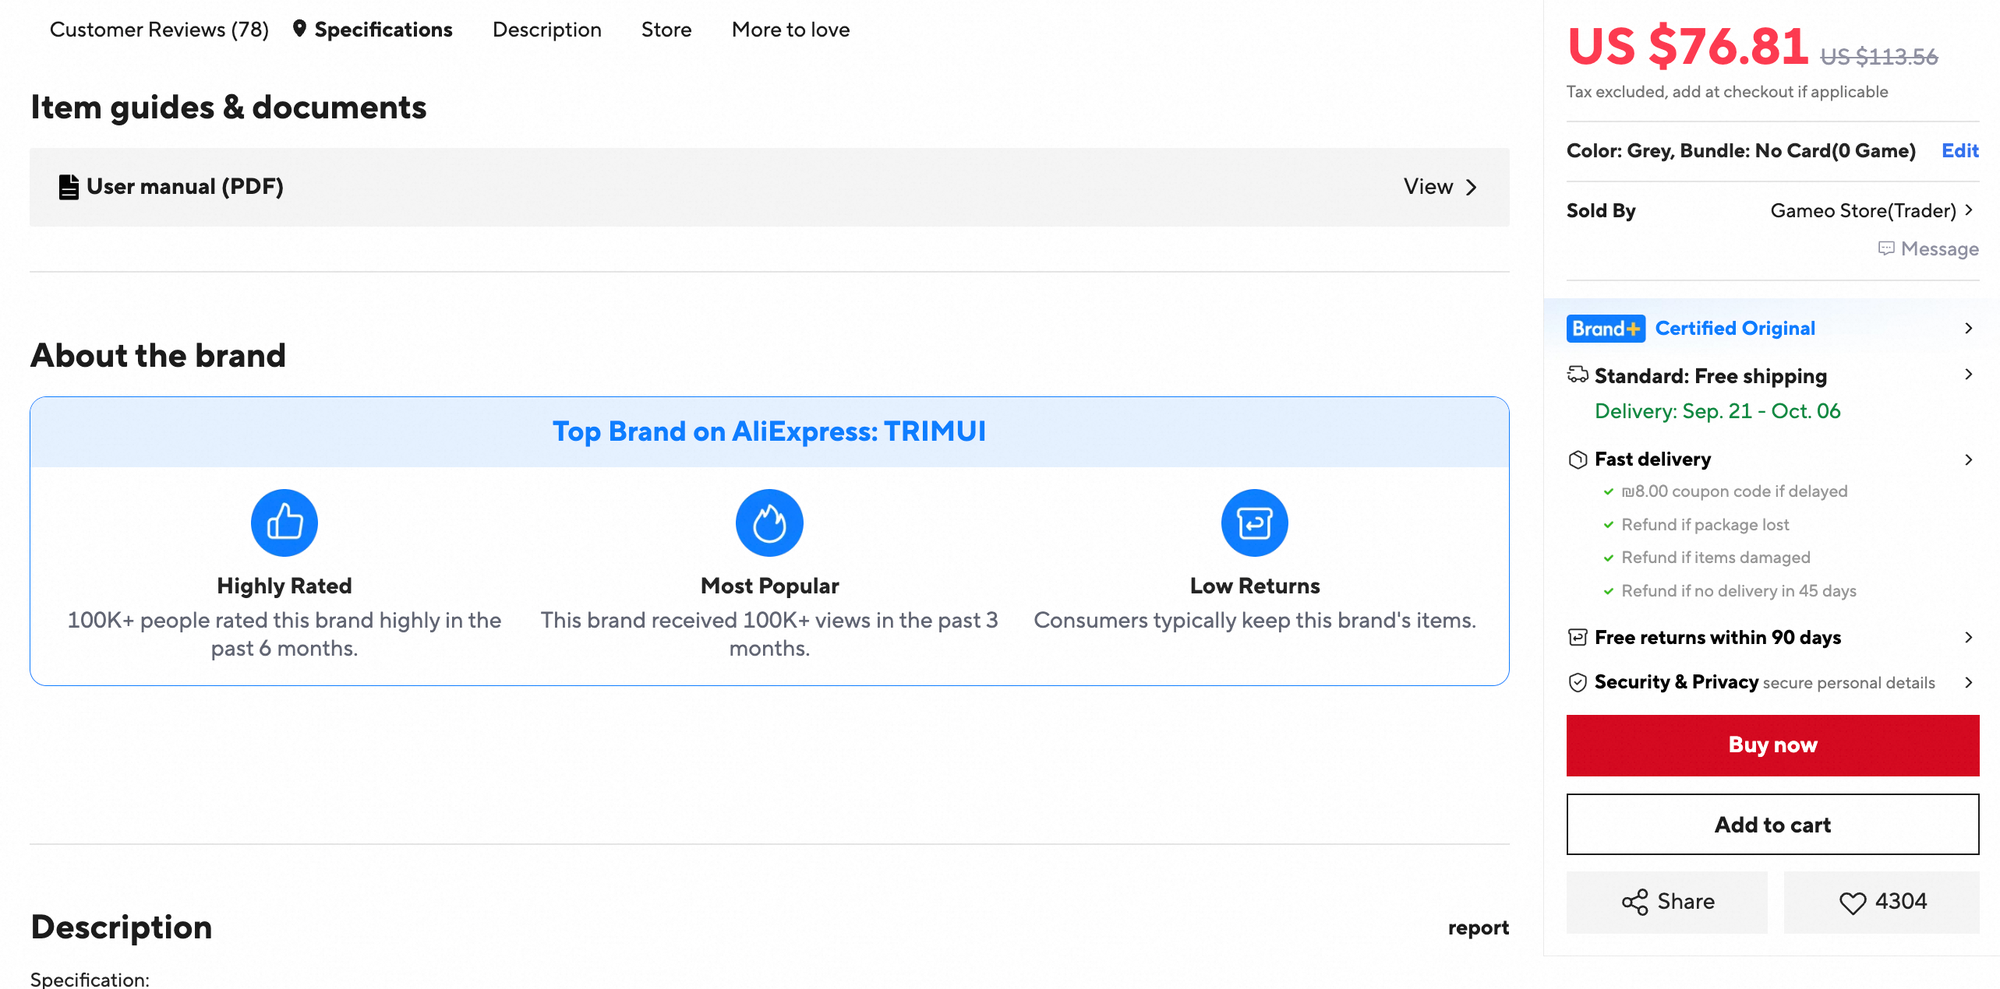
Attributes can appear in Specifications. A manual can appear under Item guides & documents, separate from the seller-written Description.
Why it matters
Buyers compare compatibility, features and components before choosing. A correct manual sets realistic expectations and supports safe, informed use.
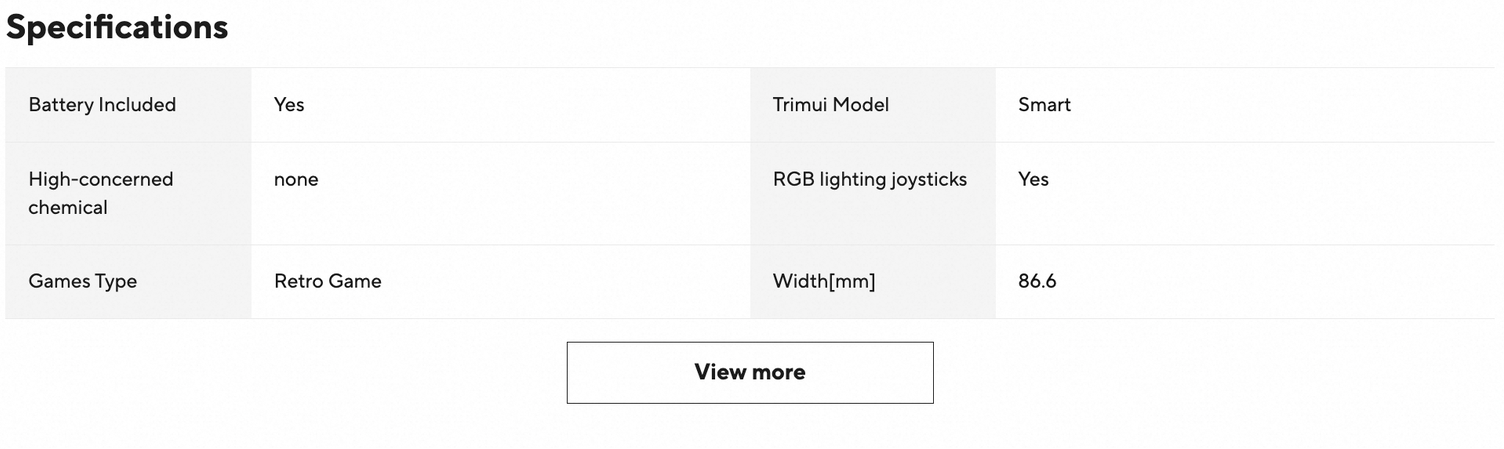
Fill what is true—not every possible field
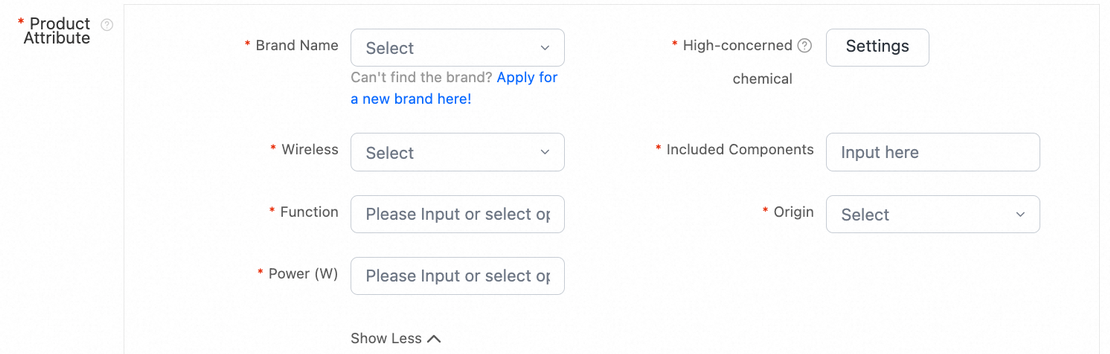
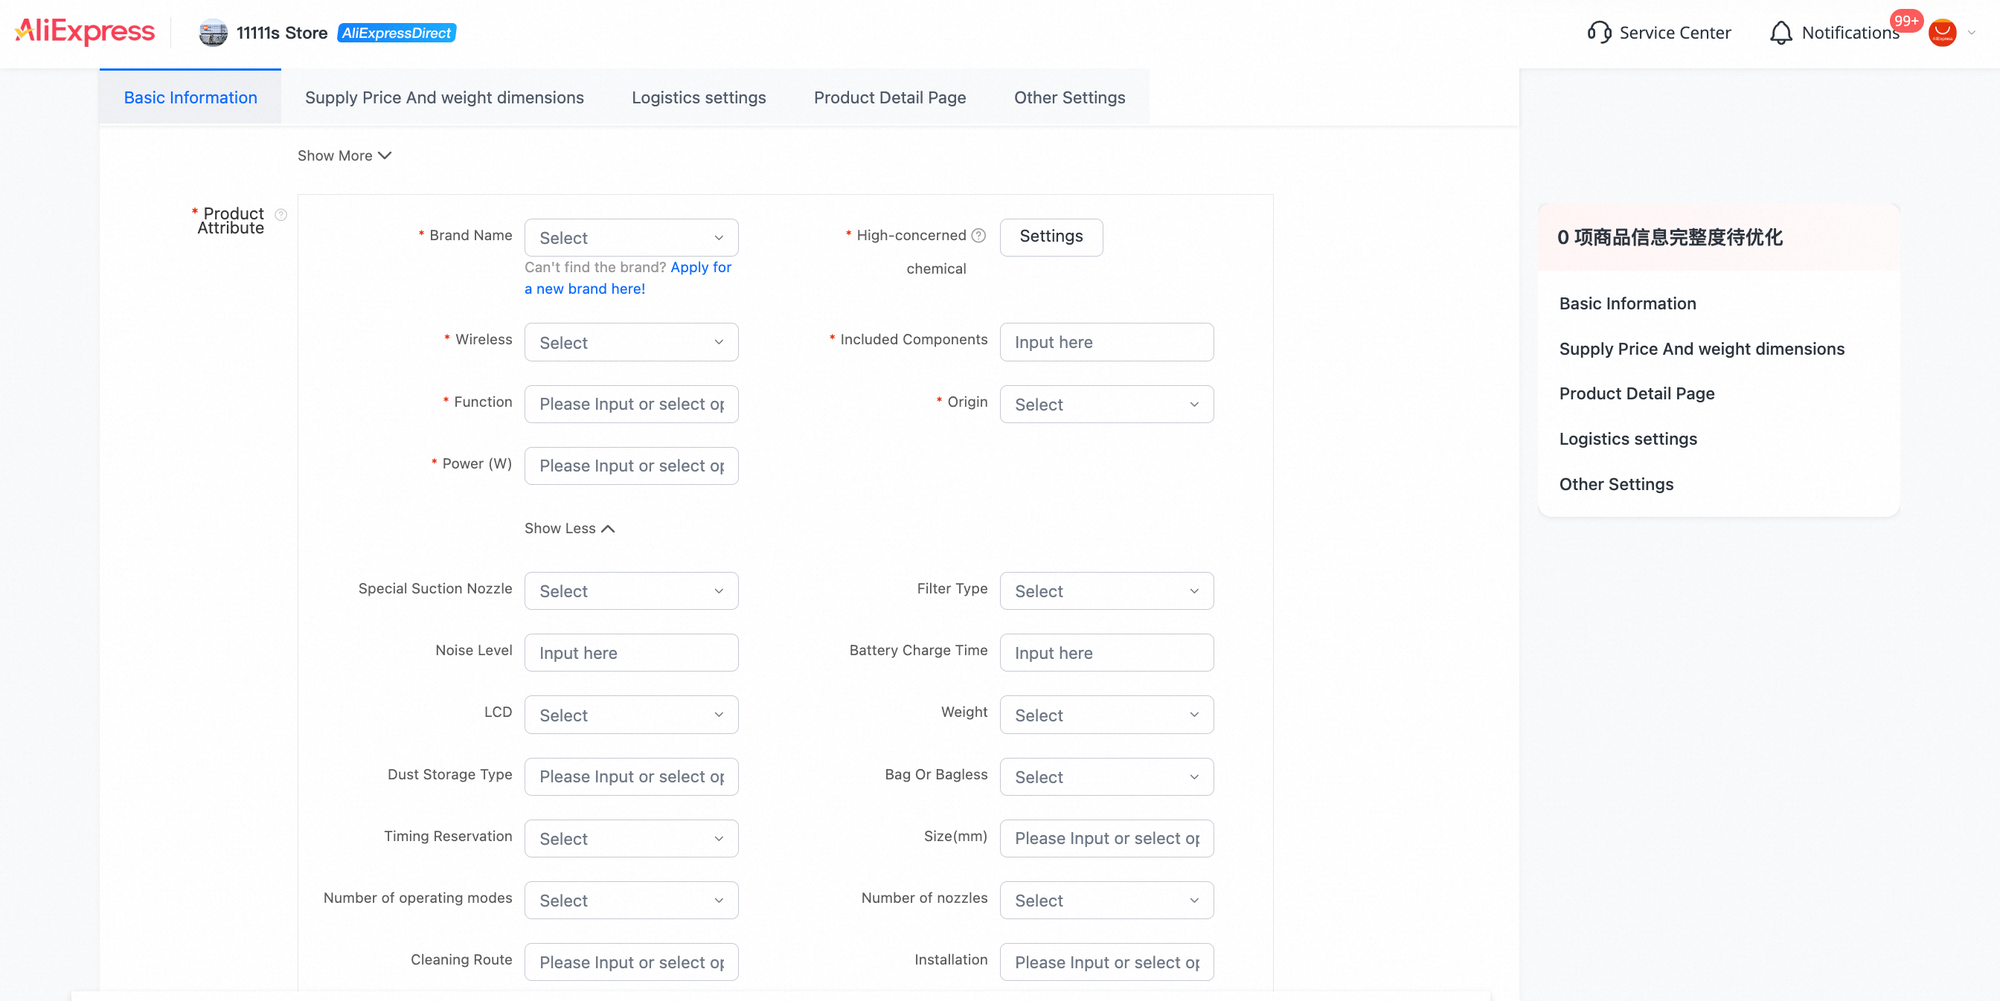
Required examples in the vacuum category include Brand Name, High-concerned chemical, Wireless, Included Components, Function, Origin and Power (W). Use the appropriate selection or input for your actual product. Do not guess a value merely to fill a box.
Use Show More for additional attributes and Add custom properties where you need an applicable extra detail. The category determines which attributes you are offered. Not every field is guaranteed to appear on the buyer page, or in the same order.


For the manual, choose Upload Product File and follow its current file-format, size and requirement instructions. Those restrictions are not shown here. The buyer example happens to say User manual (PDF); that does not establish a PDF-only upload rule.
The screenshot shows a View entry, not the opened attachment. When checking your own live listing, open it and confirm that it is the correct file and language. A “Specification” heading typed inside Description is not the structured Specifications block.
Reference screenshots 08, 09 and 15 · Full attributes, manual upload and buyer information blocks
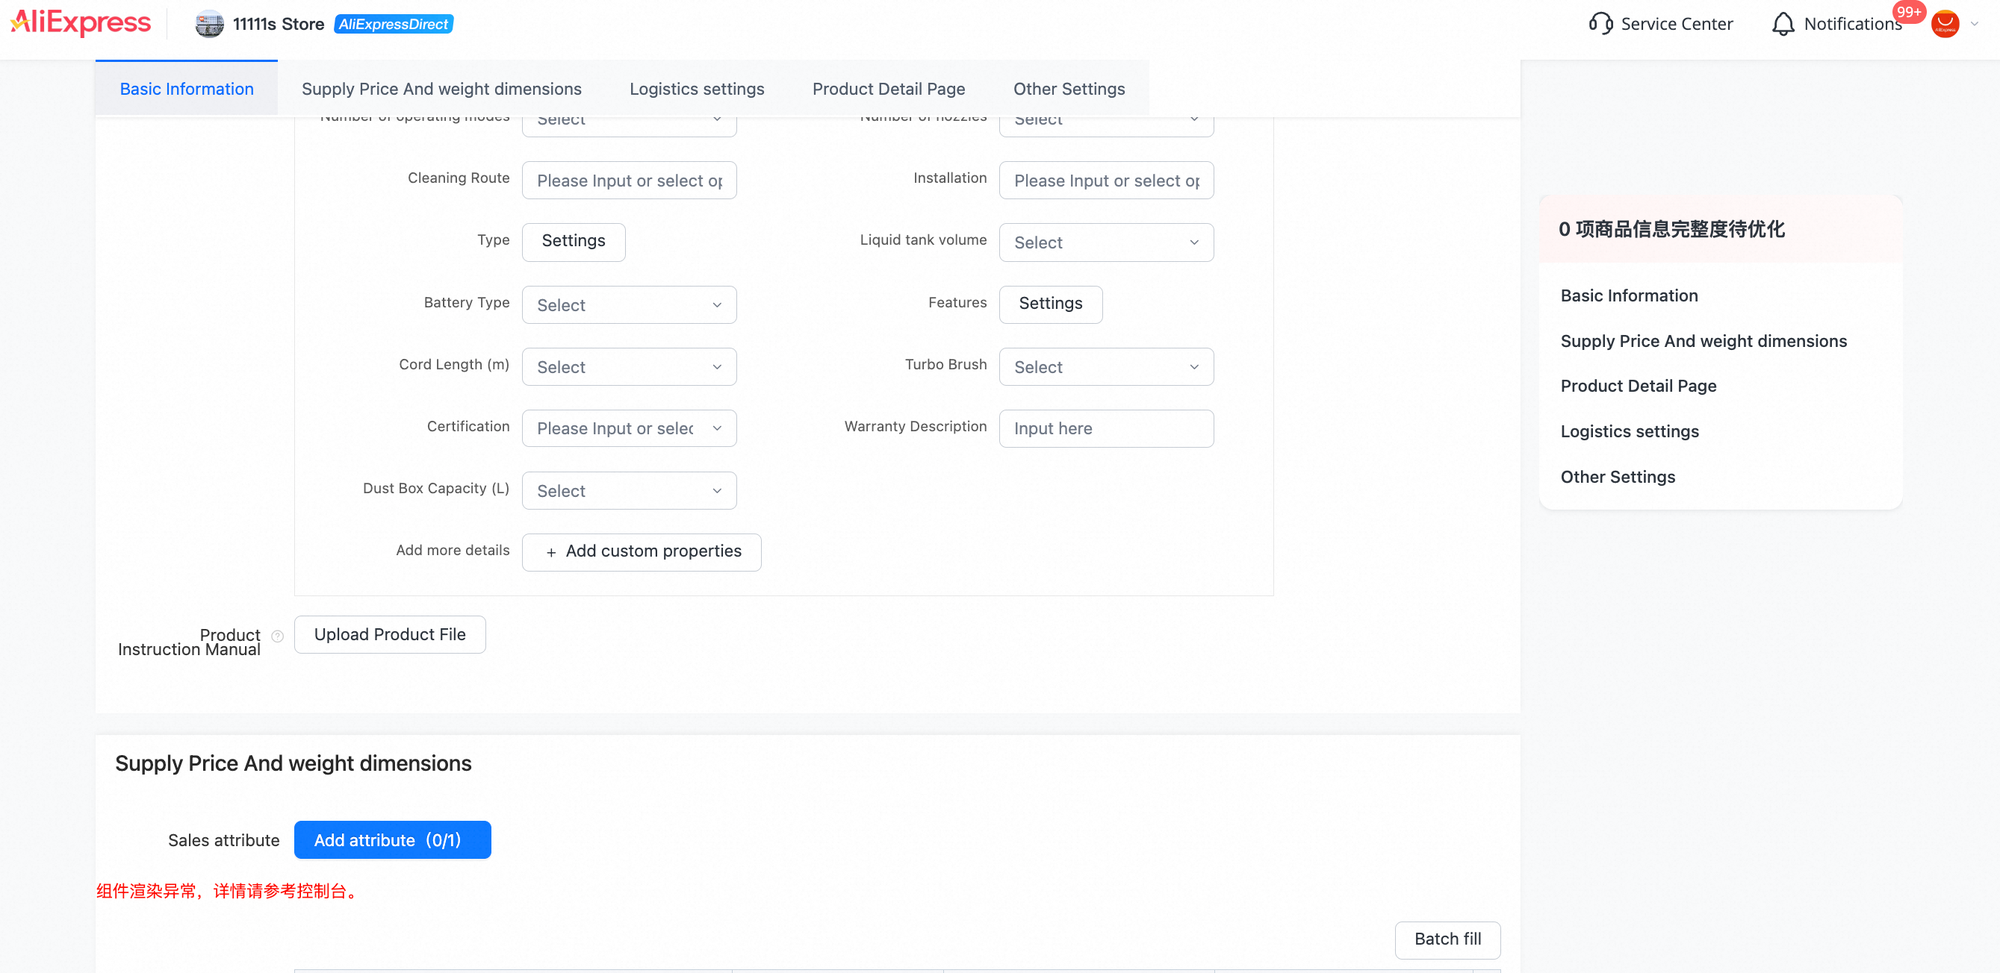
Screenshot 09 also preserves a Chinese error below Sales attribute. Its meaning and the required next action are explained in the next chapter.
Configure what the buyer can actually order
A SKU is a saleable version. Its selection, supply price and fulfilment data need to agree.
What you enter
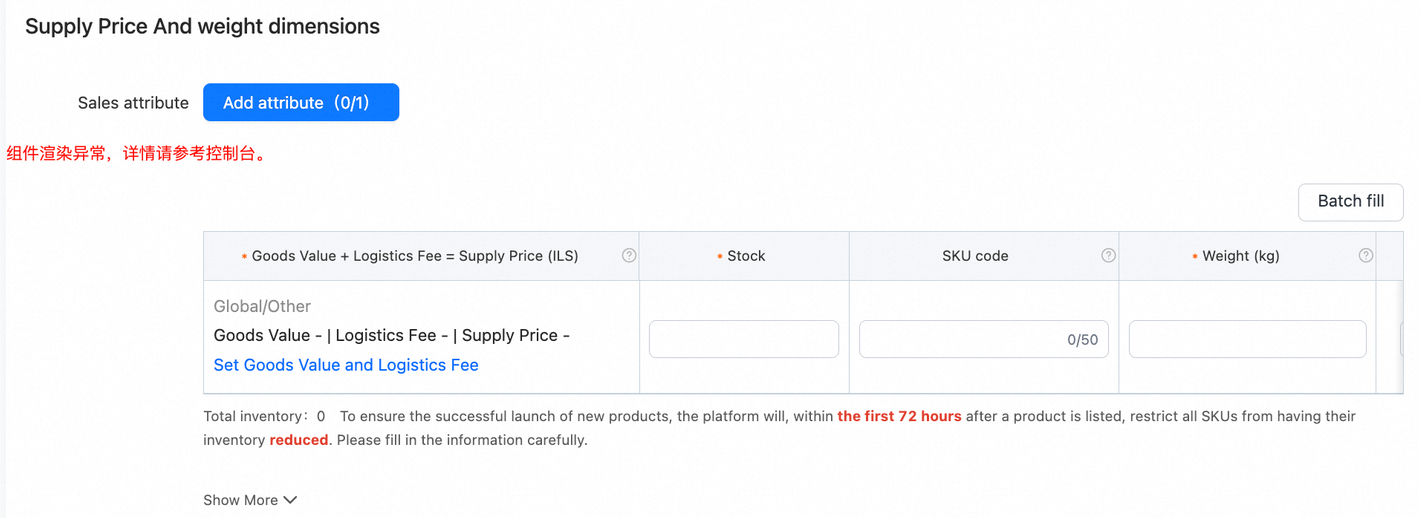
Use Sales attribute → Add attribute (0/1) for an applicable option such as colour or capacity. Then configure each resulting SKU row: supply-price inputs, stock, code, weight and any applicable dimensions.
Where buyers see it
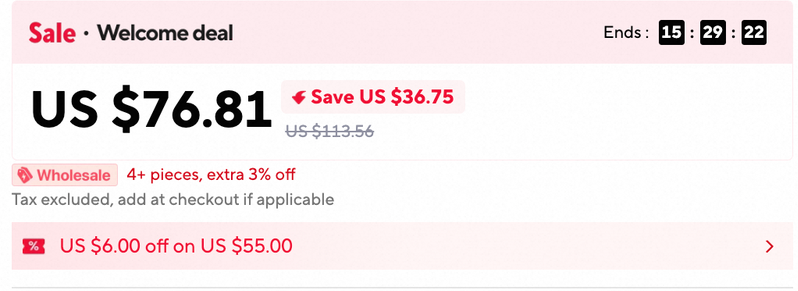
Buyers choose versions through selectors such as Color and Bundle. Availability affects whether a version can be bought. Internal SKU codes are not buyer-facing option labels. AliExpress sets the retail price, which can differ from your supply price.
Why it matters
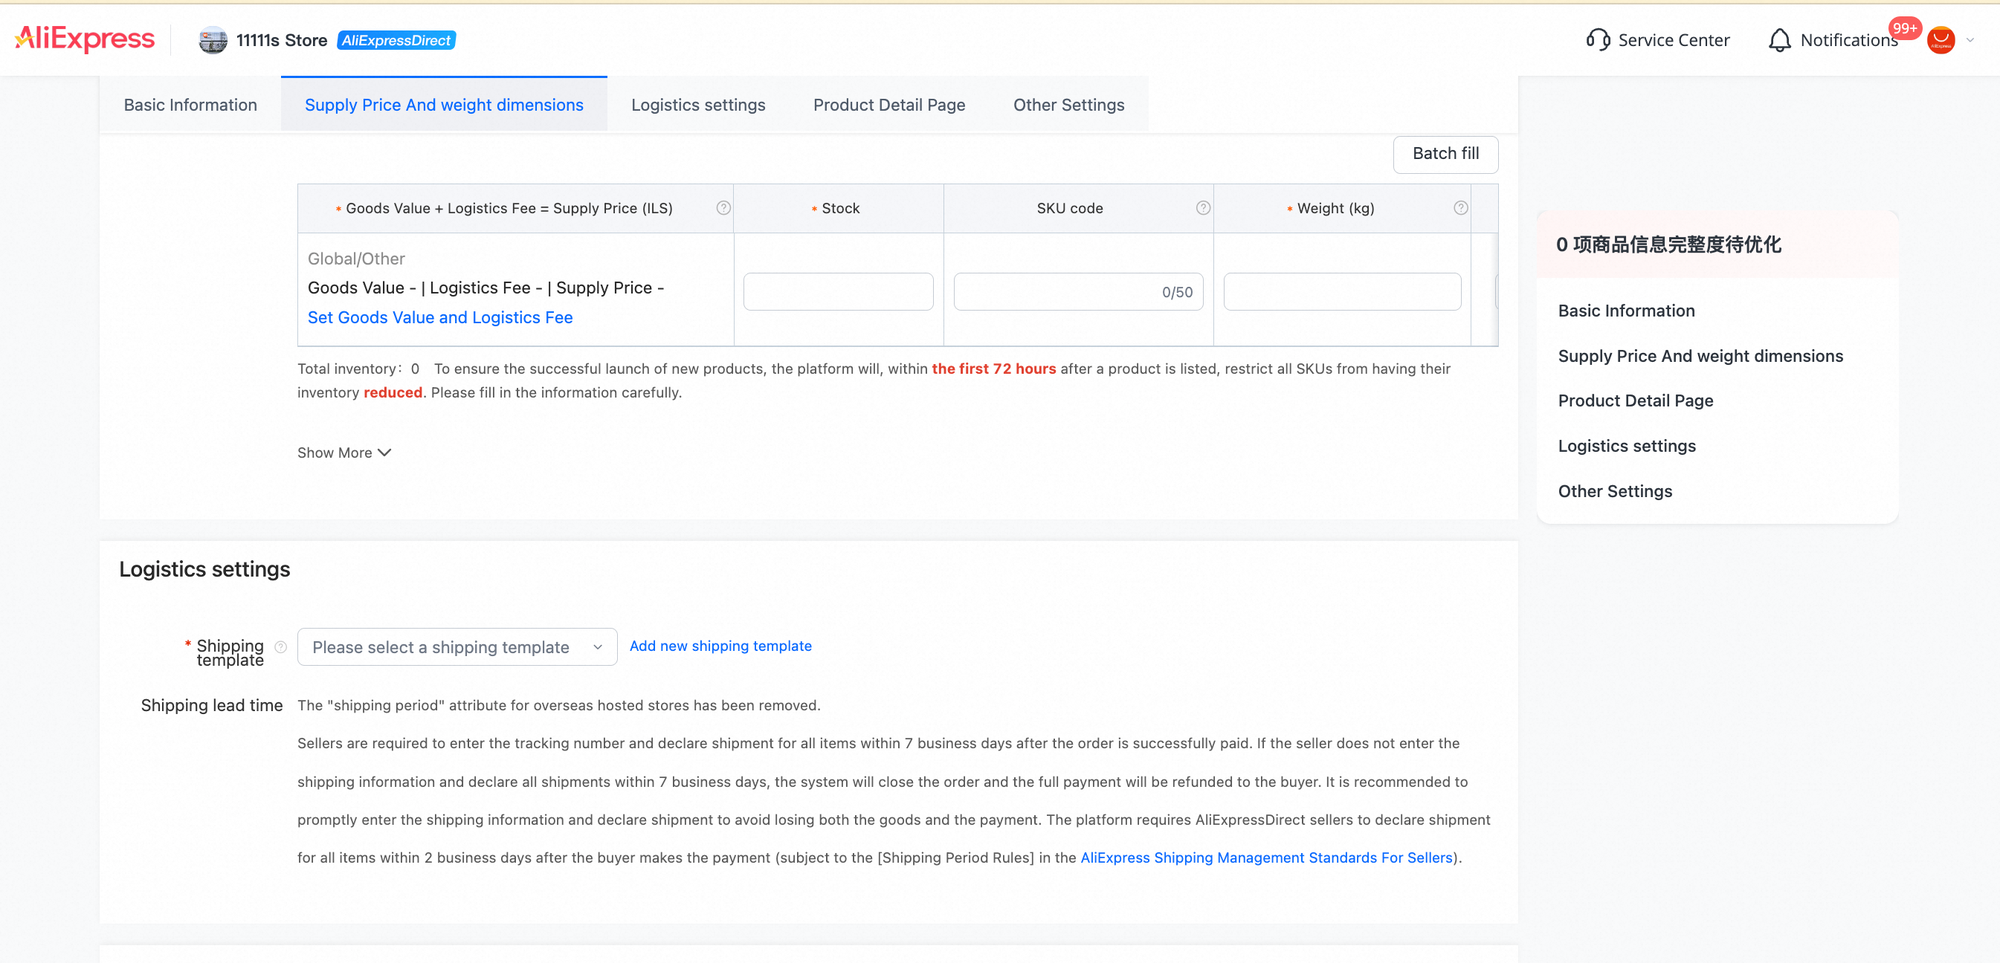
A buyer must receive the version they selected. Accurate stock and physical data support fulfilment. Check your supply price carefully: AliExpress uses it as the settlement basis, even when it changes the buyer's retail price.
Resolve the visible error before continuing. Screenshots 09–10 show a Chinese message meaning “Component rendering error; see the console for details.” This is not a successful SKU setup. Refresh the page; if it persists, contact support. Do not ignore it and submit.
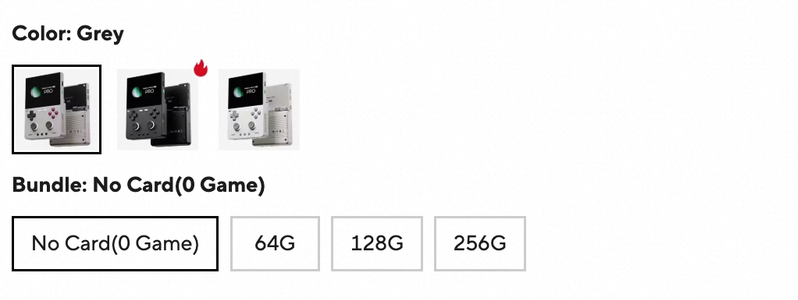
The TRIMUI example uses Color: Grey and Bundle choices including No Card, 64G, 128G and 256G. These illustrate version selection, not a verified bundle-selling switch or a shared SKU setup with the vacuum form.
| Seller field | How to fill it | Buyer meaning |
|---|---|---|
| Supply Price (ILS) | Use Set Goods Value and Logistics Fee. This form calculates: Goods Value + Logistics Fee = Supply Price (ILS). This is your selling price to AliExpress and the basis for settlement with you. Campaign pricing reminder: before you publish, leave room for campaign participation in the supply price. A practical planning range previously discussed is 12%–15%: for example, if your target supply price is ₪100, consider whether ₪112–₪115 is commercially sustainable before you publish. This is planning headroom, not a guaranteed campaign discount or a platform rule. Check current campaign terms, your true costs and settlement conditions before joining any campaign. | AliExpress sets the buyer's retail price and may increase or decrease it. Those changes do not change the supply-price basis for settlement. Do not equate the ILS field with the screenshot's USD retail price. |
| Stock | Enter real, fulfilable inventory for each version—not an optimistic sales target. | Stock affects whether the version can be purchased. The exact internal quantity may not be displayed. Quantity controls and purchase limits are not stock counts. |
| SKU code | Use a consistent internal identifier to match the version to your records. This example shows a 0/50 counter. | This is not the Color label. Do not rely on an internal code to explain the option to a buyer. |
| Weight (kg) | Read the field help and record the requested weight in kilograms. Do not interchange packed shipment weight and product net weight. | Fulfilment data, not an automatic copy of a weight line in Description. |
| Dimensions | Complete the actual dimension fields your form presents, using their units and definition. Do not infer unseen controls from these screenshots. | Product Attribute's Size(mm) is not the same as SKU logistics dimensions. Explain product size separately where needed. |
Your supply price is the price at which you sell the product to AliExpress.
AliExpress sets the retail price shown to buyers and may increase or decrease it.
Regardless of changes to the retail price, AliExpress settles with you based on the supply price you provide.
Inventory notice: the screenshot says inventory reductions are restricted during the first 72 hours after a product is listed, not after submission. Check the current rule before committing stock. This does not mean sales stop deducting inventory.
Reference screenshot 10 · Uncropped SKU area, component error and stock notice
Connect a delivery plan you can fulfil
Shipment declaration and delivery to the buyer are different deadlines.
What you enter
In Logistics settings, select the appropriate existing Shipping template. Check its coverage and costs for the product. Creating a new template is a separate lesson.
Where buyers see it
The delivery panel can show a shipping method, cost and estimated Delivery dates. These depend on the template and platform conditions for the buyer's destination and order.
Why it matters
Buyers consider delivery cost and timing before ordering. Choose a plan that matches your real fulfilment capability.
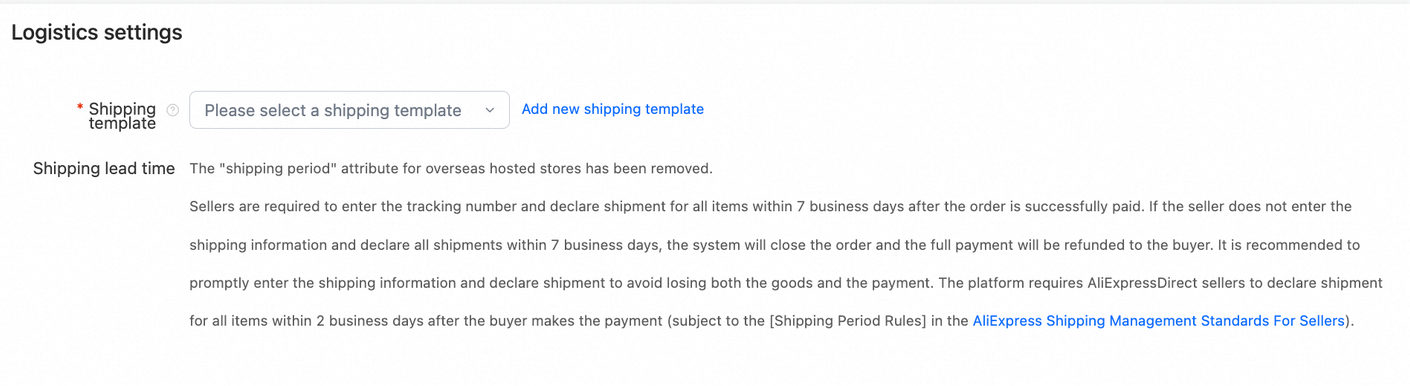
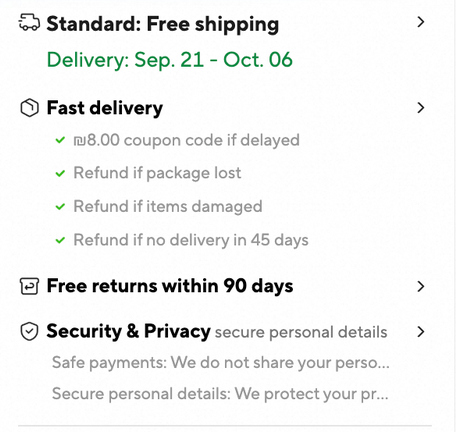
For the AliExpressDirect account shown: declare shipment within 2 business days after payment. Apply the current rules for your account. This is a shipment-declaration deadline, not a promise of delivery in two days.
The same notice also contains a general seven-business-day statement for overseas stores. Do not use that general wording to teach a Direct seller that they can wait seven days. Follow the more specific Direct rule shown for this account.
The TRIMUI panel's 90-day free returns, compensation statements and other service labels are not universal promises for every Israeli seller. A shipping template alone does not determine every badge or service benefit.
Reference screenshot 11 · Complete logistics section and shipment notice
Write the explanation a buyer still needs
Use Description to connect the facts: how the product works, what is included and which version the content describes.
What you enter
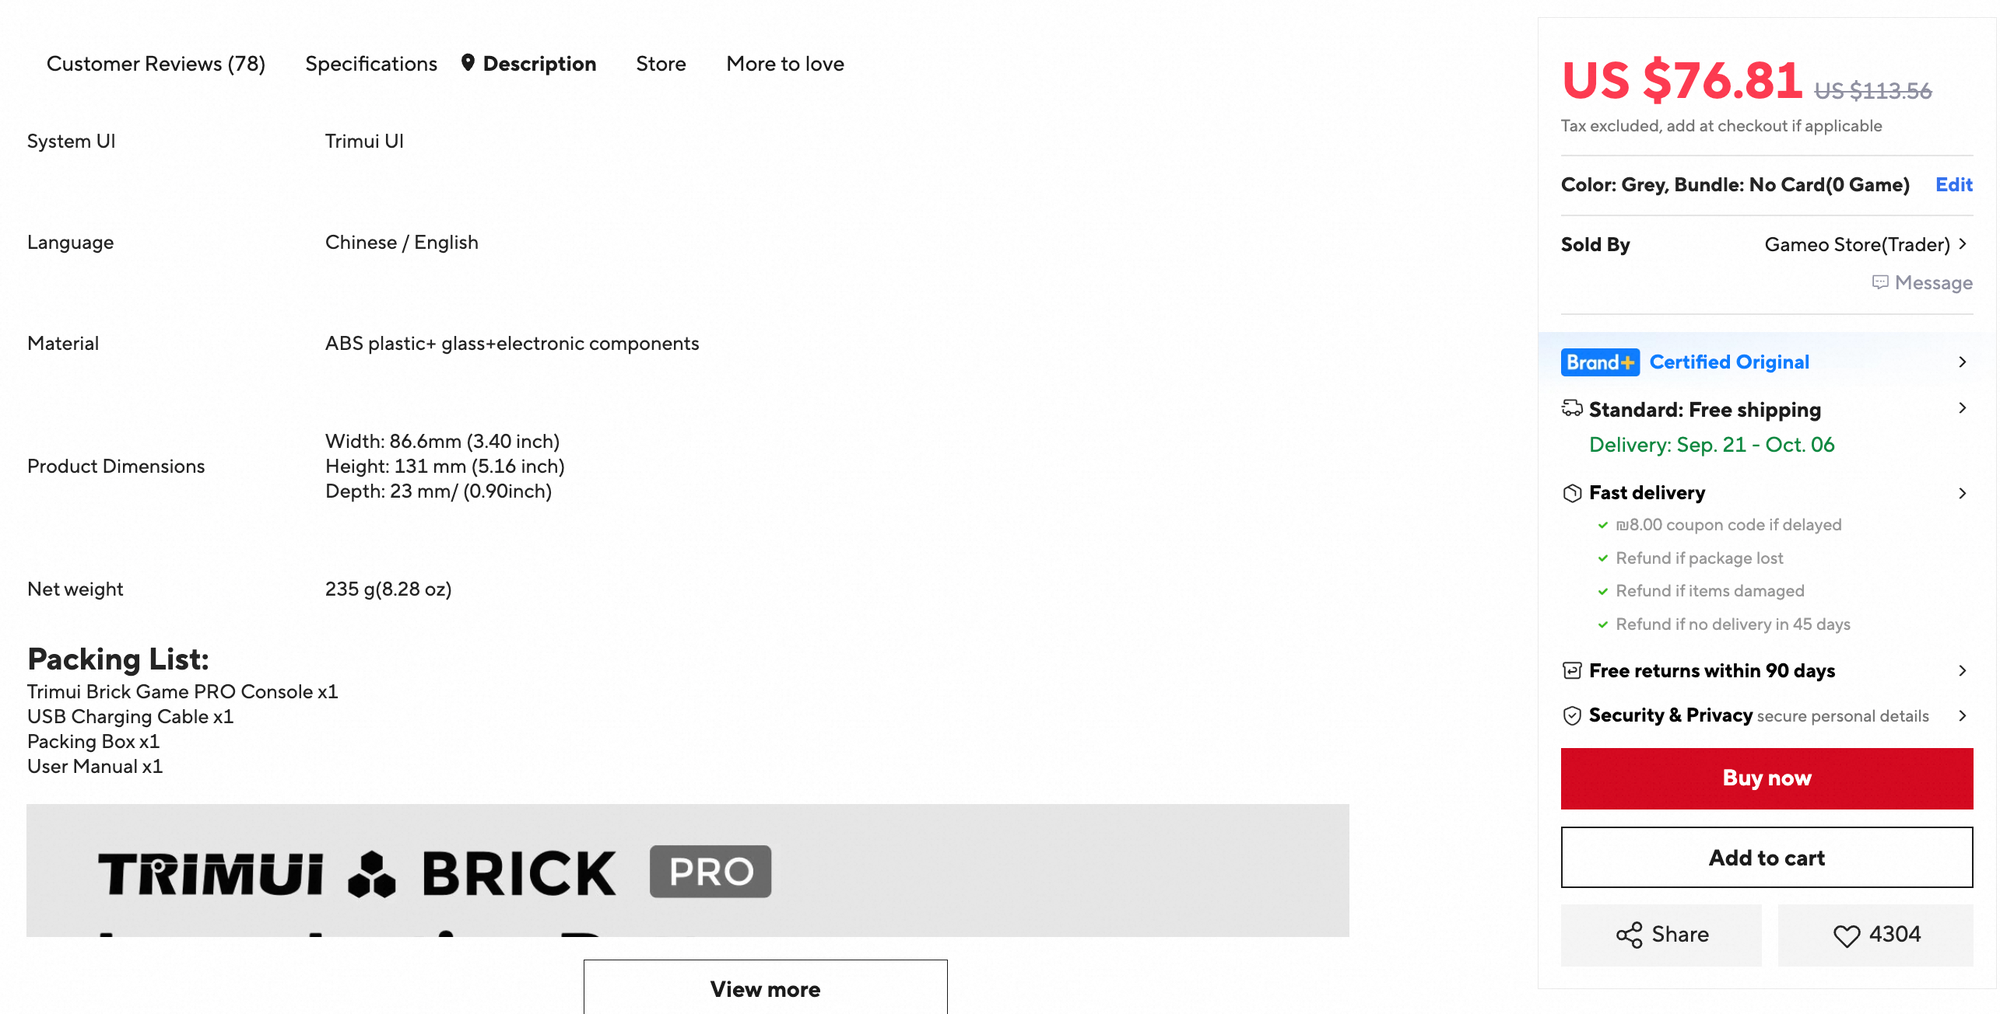
Check Description Language, then use the Product Description editor for readable text and images. Explain real features, use, limitations, product dimensions and the packing list where applicable.
Where buyers see it
This content appears in Description, including explanatory text and long images. It is separate from structured Specifications and the manual attachment.
Why it matters
Buyers need to understand what comes in the box and whether it suits their use. Contradictory text or images make the choice harder.
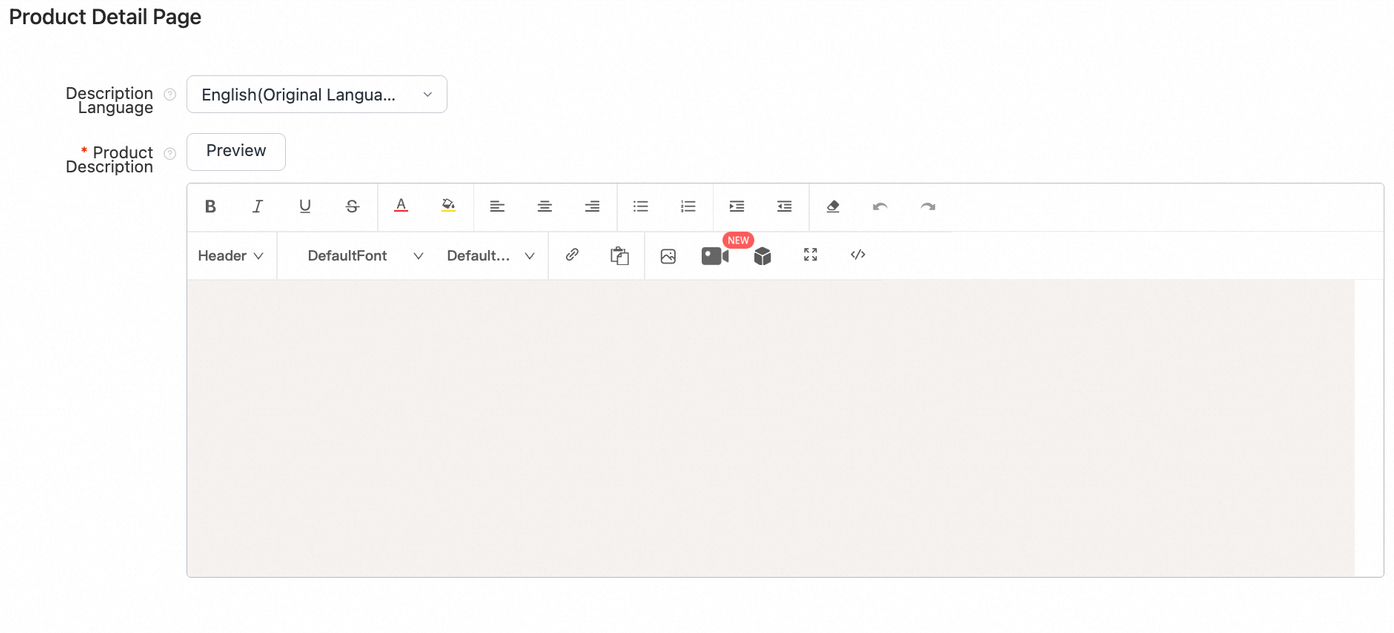
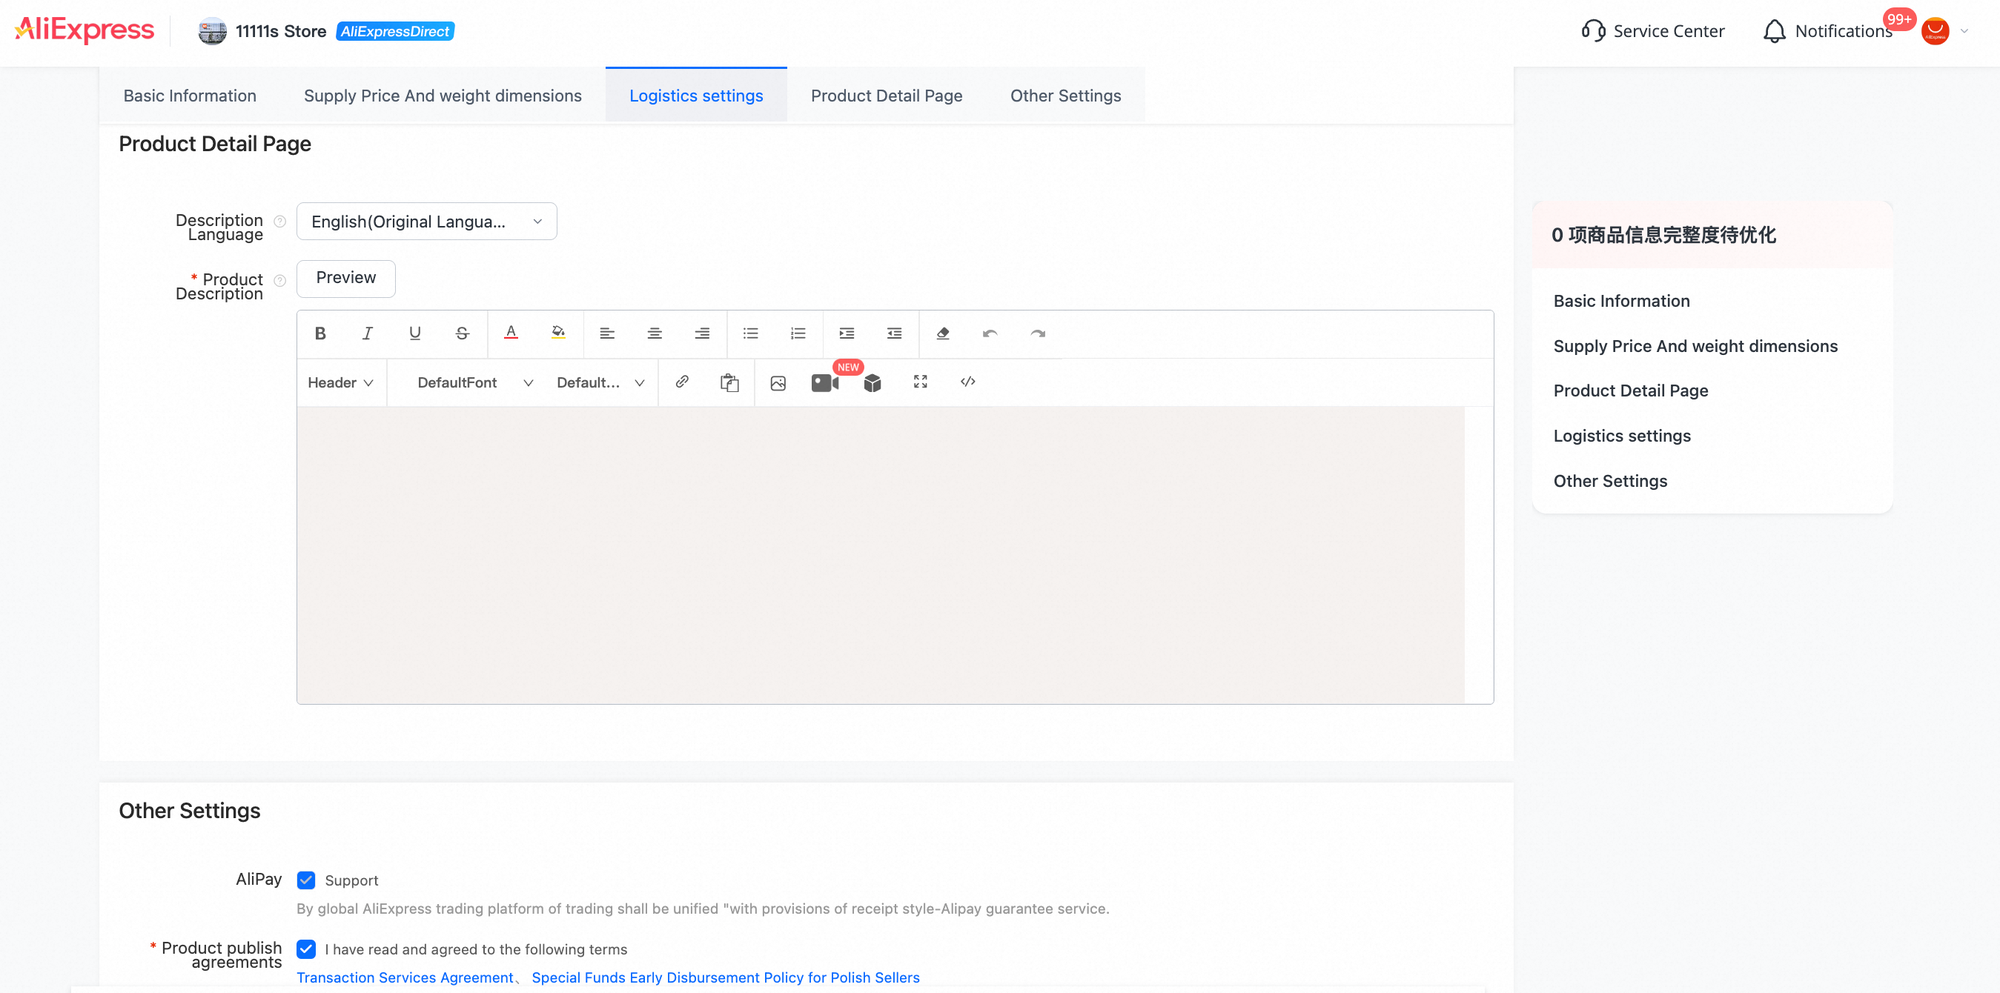
- Check the source language. The displayed value begins “English (Original Langua…)”. Select the appropriate available language in your account; Hebrew availability has not been demonstrated by this unopened menu.
- Organise the explanation. Start with what the product does. Add useful features, relevant dimensions, use or compatibility notes, then the packing list. Match every statement to your actual product and version.
- Use supported formatting. The toolbar includes rich-text, image and source-view controls. Use the editor's supported content—not arbitrary JavaScript.
- Use Preview. Check the language, image loading, legibility and layout. Remove content that conflicts with the title, options, structured attributes or manual.
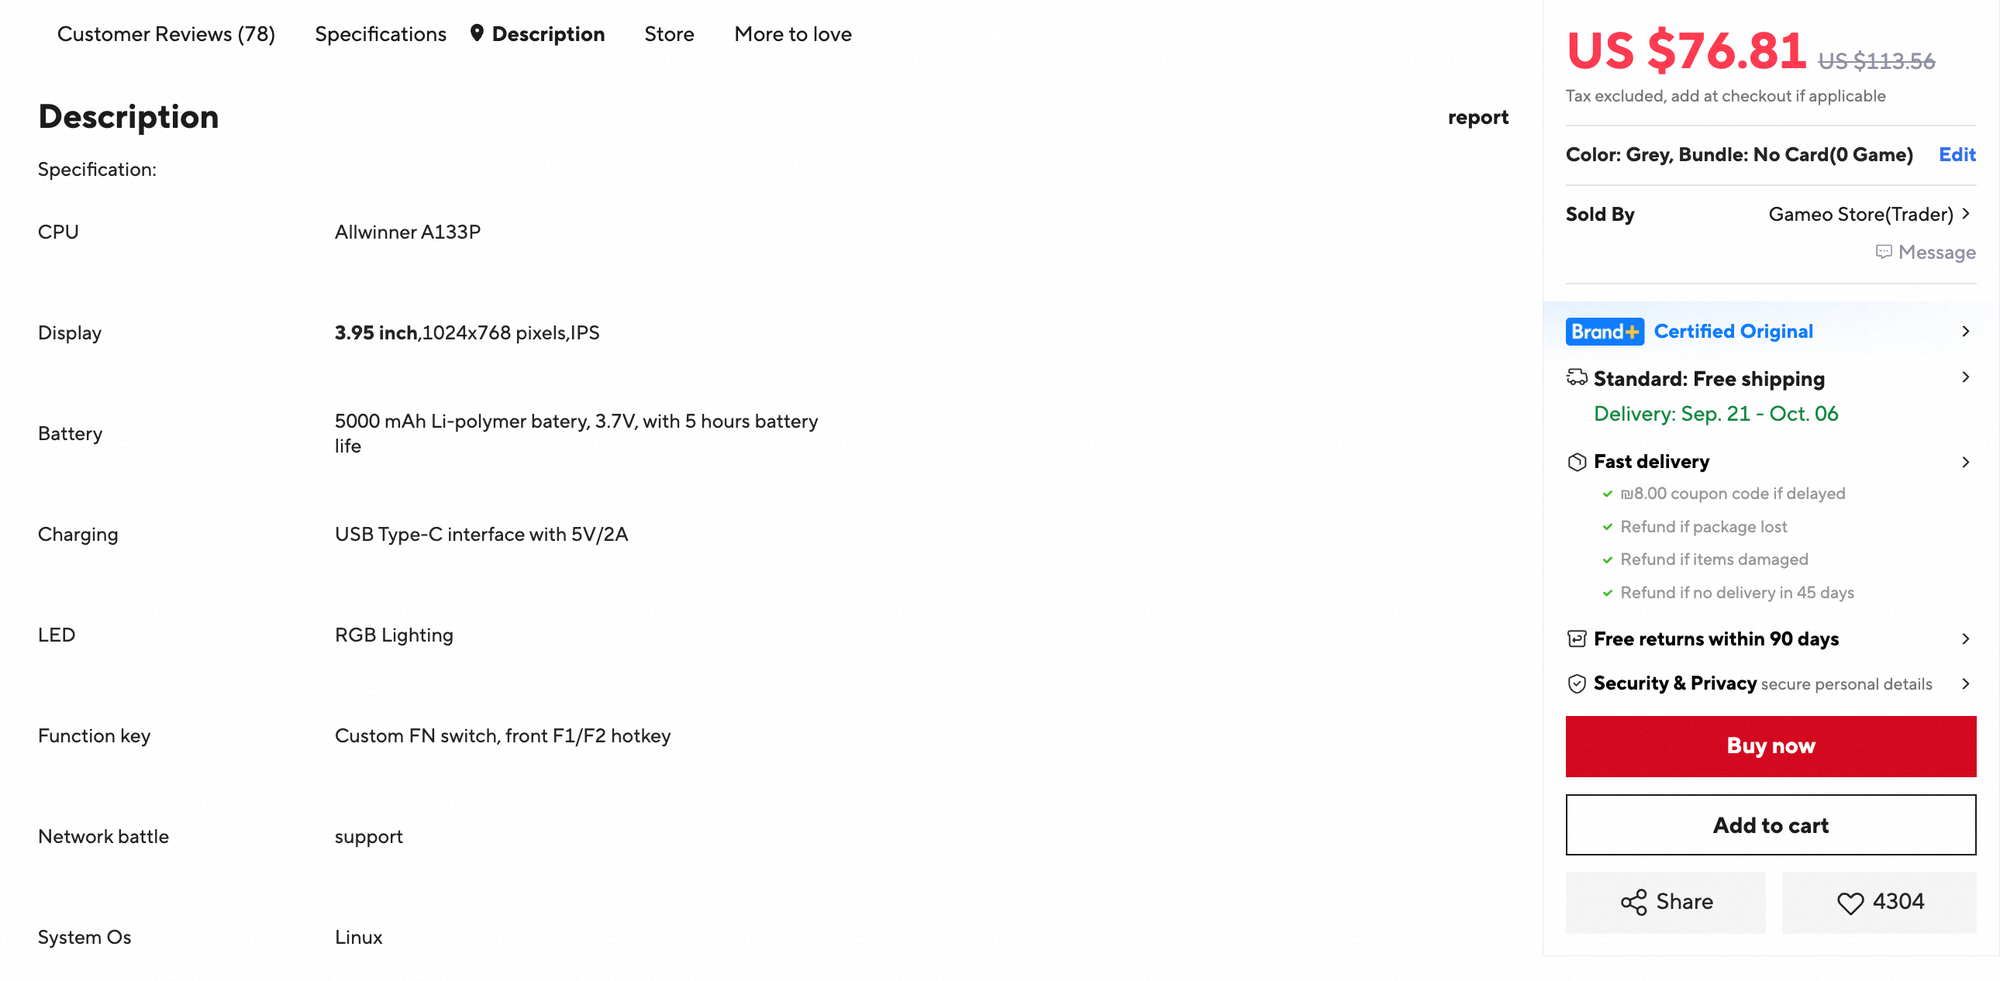
Check consistency rather than copying example values. The TRIMUI AI overview says 1024 × 600, while its Description says 1024 × 768. Neither is treated here as a verified product specification. Confirm the correct value from the product's authoritative materials and fix inconsistent content or raise the platform-generated discrepancy with support.
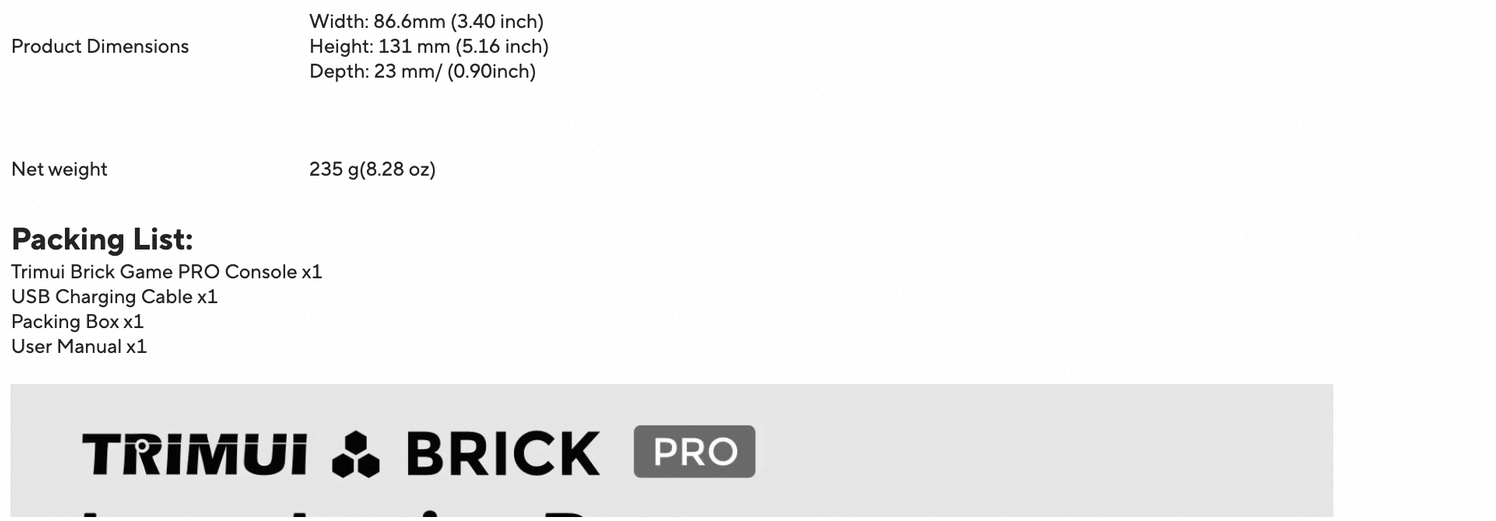
“Language: Chinese / English” in the sample Description describes the product's supported languages—not the listing's publishing language. Net weight and product dimensions typed into Description do not automatically populate SKU logistics fields. Screenshot 18 shows where such content appears, not independently verified measurements or packing contents.
Reference screenshots 12 and 16–18 · Editor and the full buyer Description sequence
Read, check, then submit
Submission starts the next stage. It does not prove the product is already on sale.
What you enter
Review AliPay / Support and the Product publish agreements. Read the applicable terms before agreeing. Resolve required-field and validation issues, then use Submit when ready.
Where buyers see it
Agreement controls and review status stay in the seller workspace. A listing only becomes a buyer-page experience when its actual publication status permits it.
Why it matters
You are confirming product information and applicable commitments. A form with errors—or the wrong account-specific terms—needs attention before publication.
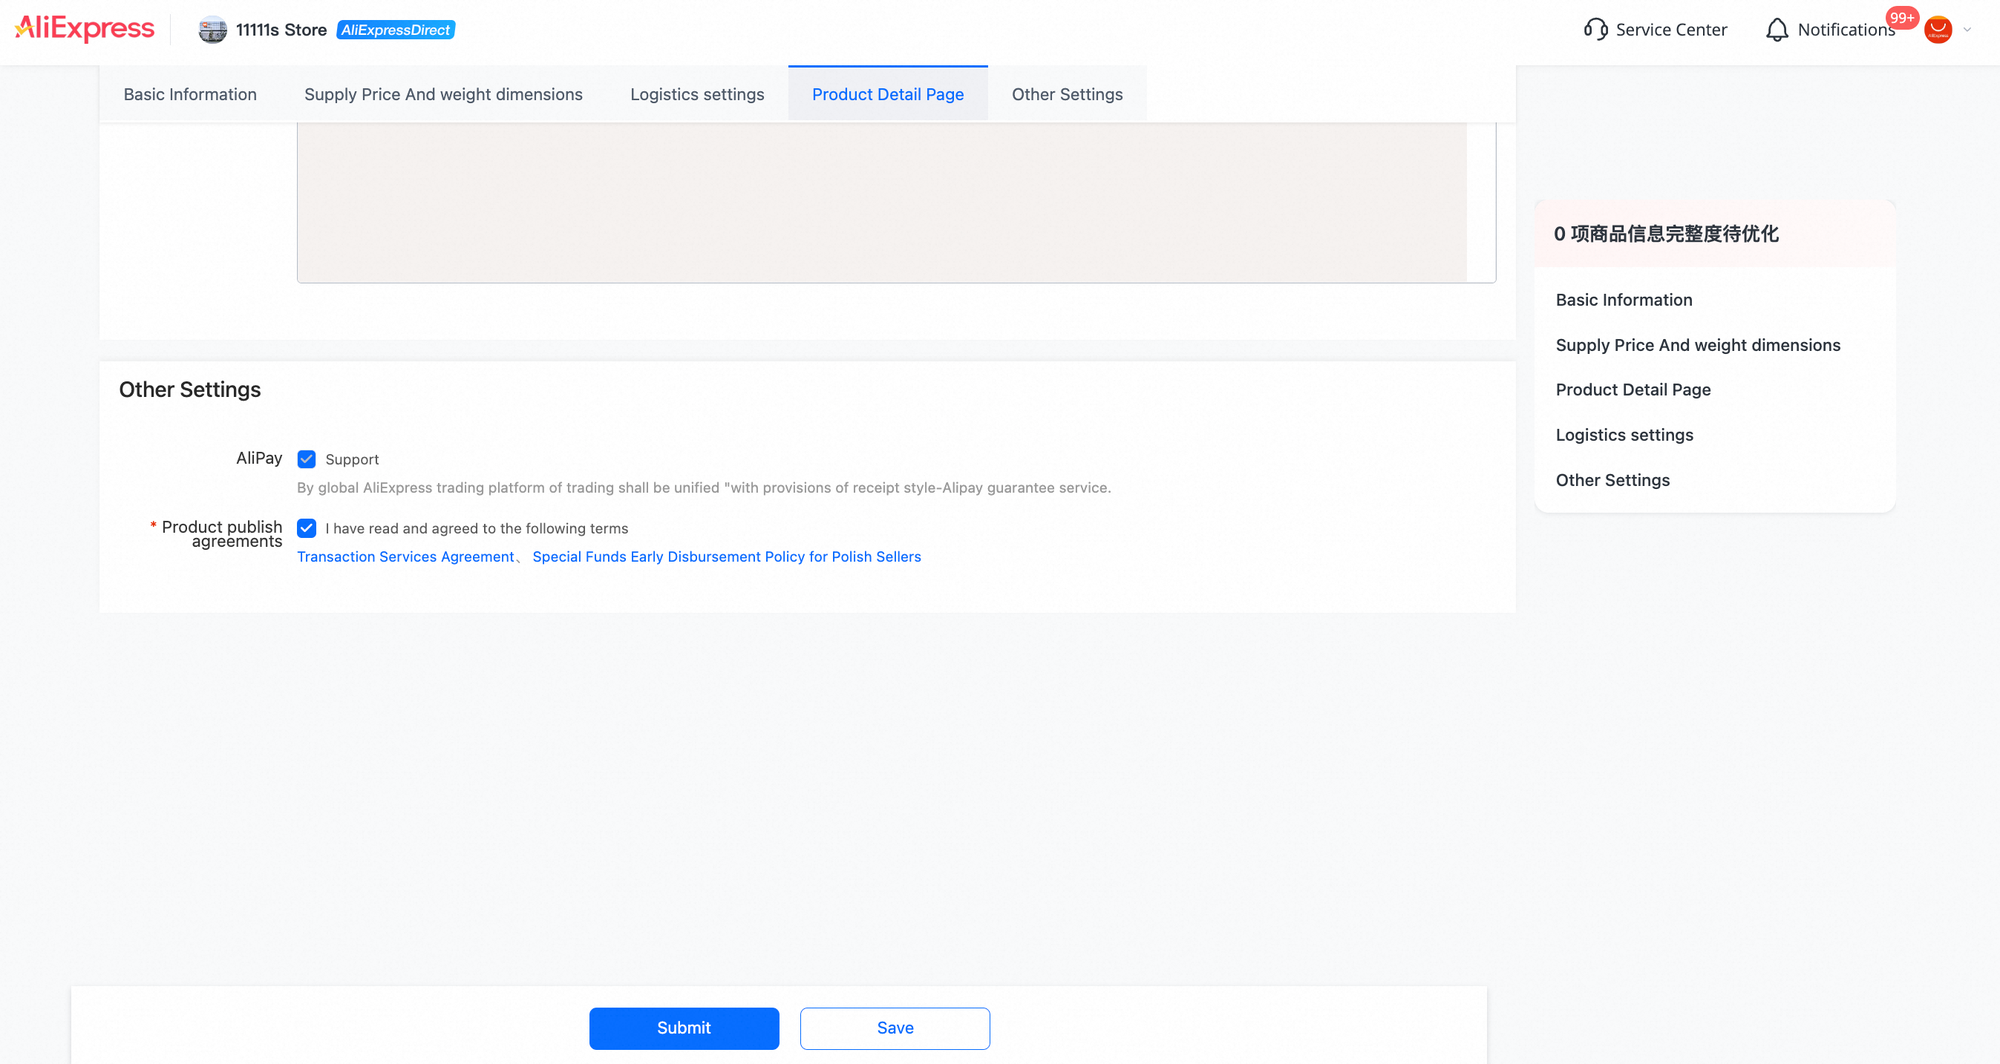
Check country applicability. One visible agreement title refers to Polish Sellers. Do not assume that policy applies to a local seller in Israel. Check the account/country context and applicable terms with your account manager or support before accepting them. Checked boxes in a screenshot are not instructions to accept by default.
Not ready? You can use Save and then confirm the actual saved record and status in Product Management. The screenshot does not establish that Save always produces a Draft.
After Submit, return to Product Management. Check Under Review, Failed or On Sale for your product, and address any feedback. Do not announce that it is live solely because you clicked Submit.
Finish on the buyer page—not the Submit button
Once your own listing is on sale, inspect the experience a local buyer actually receives.
What you enter
No new field is filled here. Compare the buyer page with your intended inputs. If something is wrong, return to the correct listing's Edit screen—or contact support for platform-controlled content.
Where buyers see it
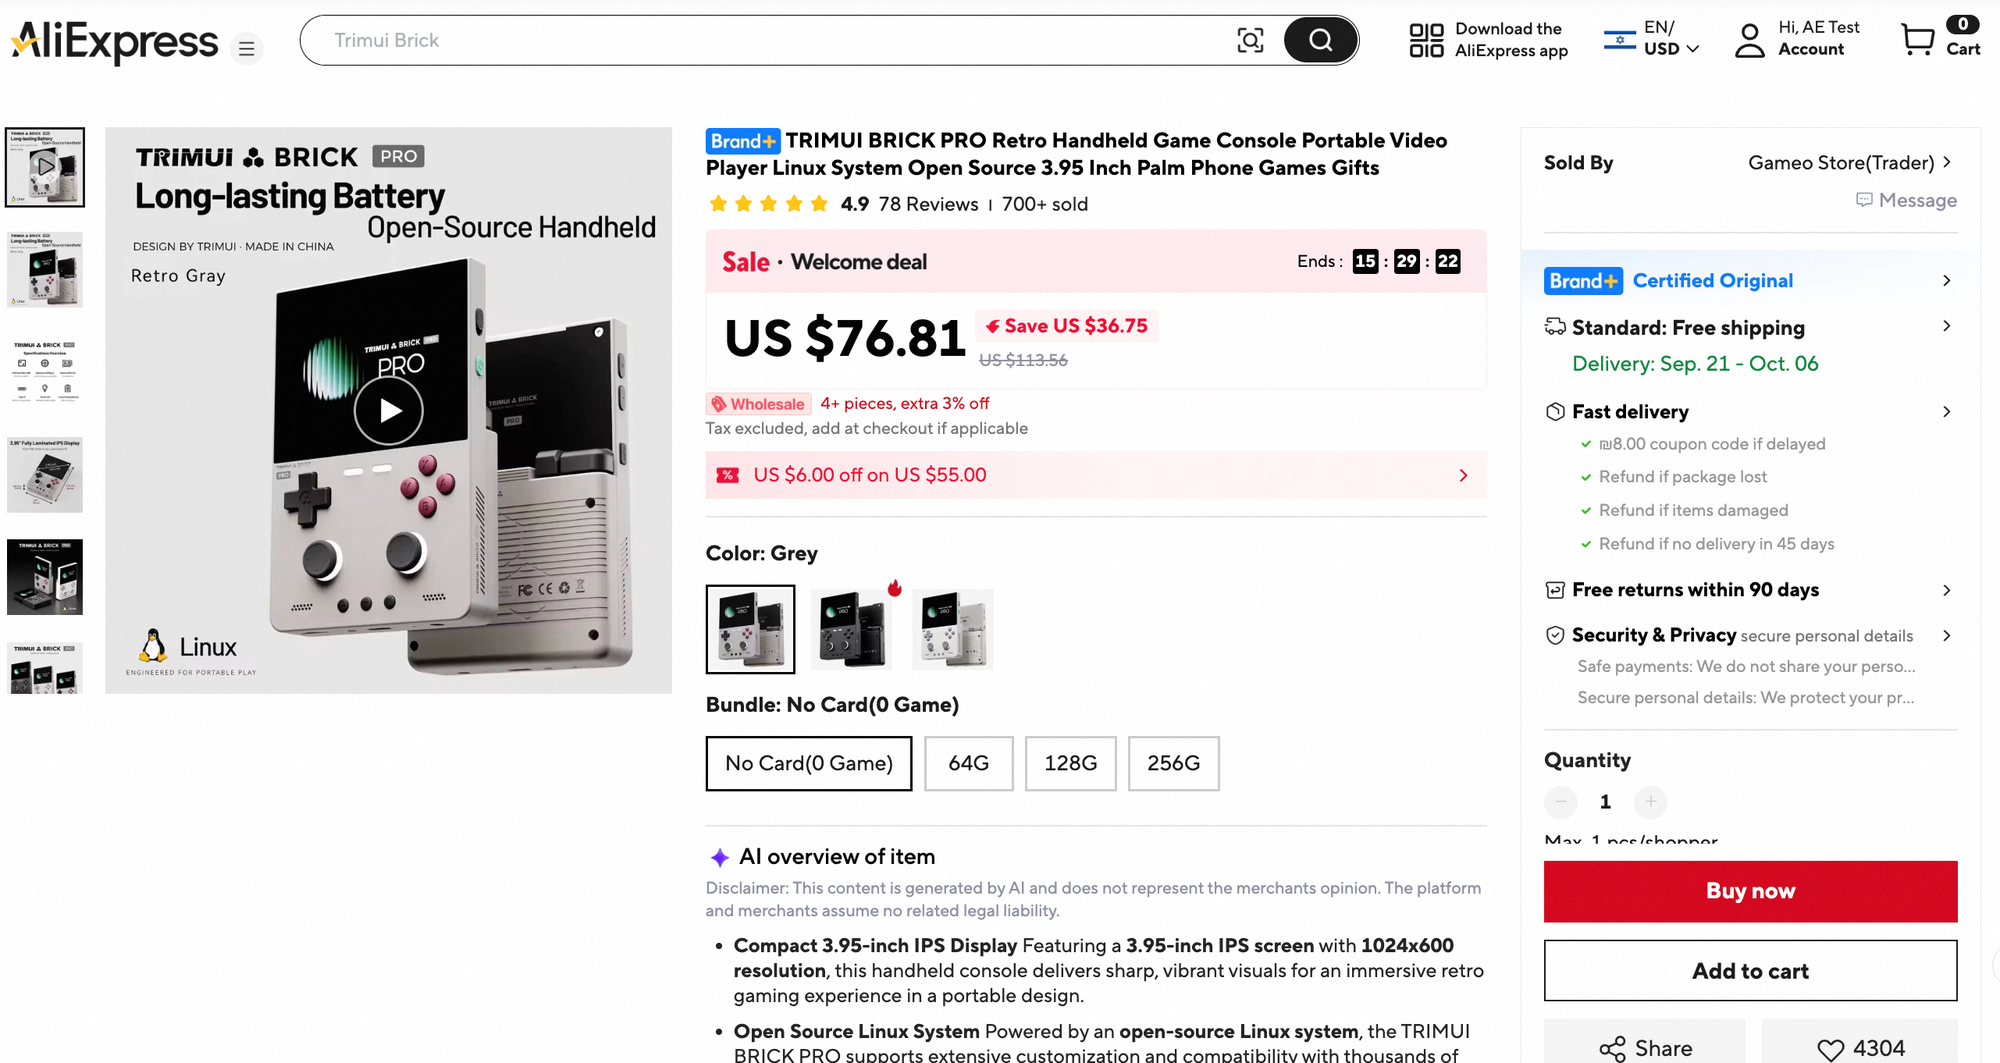
Check the whole journey: the title and gallery, each version choice, Specifications, the manual, Description and the delivery panel for the intended destination.
Why it matters
Your responsibility is a coherent, buyable offer. A shopper should not have to reconcile conflicting facts or guess which version will arrive.
Checklist marks are personal notes; they do not submit or approve a listing.
Keep the examples separate. The TRIMUI buyer screenshots locate interface elements. They do not verify that the vacuum form was completed successfully, that an attachment opens, or that the sample product's technical claims are correct.